工作总结Spring_+_axis2
最近工作用到spring+axis,现在抽空整理一下,由于实际工作中仍有细节没有弄清楚,在此只总结一下一般流程,分享给大家,希望对你有帮助,如果能解答我的疑惑还望指教。在网上查了很多资料,大多数是使用Myeclipse,出于个人喜好,我使用的IDE是Eclipse+tomcat6.0。
步骤1:在Eclipse中建立一个web项目,这里起名叫AxisTest,需要的jar包有:
commons-discovery.jar、jaxrpc.jar、saaj.jar、wsdl4j.jar、axis.jar、commons-logging.jar、spring.jar,由于网上大多数例子都是用MyEclipse自动导入jar,所以有的文章中介绍还需要activation.jar、ant.jar,但是在项目把这两个jar包去掉,照样跑通,所以此处不明白这个两个jar有何用,有谁知道请留言给我,谢谢。
步骤2:导入jar包后,分别写如下代码:
声明接口
Java代码

1. package com.webservice.axis.test;
2.
3. /**
4. * 声明方法接口
5. */
6. public interface IHelloWorld {
7.
8. public String getMessage(String word);
9.
10.}
实现类
Java代码
1. package com.webservice.axis.test;
2.
3. /**
4. * 实现接口的类,Ioc的依赖注入可以在此处自由发挥
5. */
6. public class HelloWorldImpl implements IHelloWorld { 7.
8. private String helloStr; // Spring 中需要注入的字符
串
9.
10. public String getHelloStr() {
11. return helloStr;
12. }
13.
14. public void setHelloStr(String helloStr) {
15. this.helloStr = helloStr;
16. }
17.
18. // 实现接口中的方法
19. @Override
20. public String getMessage(String name) {
21. return helloStr + ":" + name;
22. }
23.
24.}
下面一个类,感觉上像是spring和axis的结合点,用来将类发布成webService,但有些地方值得说一下。
Java代码

1. package com.webservice.axis.test;
2.
3. import javax.xml.rpc.ServiceException;
4. import org.springframework.remoting.jaxrpc.ServletEndpointSuppo
rt;
5.
6. /**
7. * ServletEndpointSupport 是spring提供支持WS的类,这里只需要
继承,但是这个类是依赖jaxrpc.jar包,
8. * 而从Apache下载的axis1.4中并没有找到jaxrpc.jar包,网上查了
很多资料,貌似jaxrpc.jar现在被
9. * jaxws-1.4.1.jar代替,曾试过将jaxws导入项目,倒是
ServletEndpointSupport 仍然不支持,难
10. * 道spring没有对jaxws的支持?
11. */
12.public class HelloWorldWebService extends ServletEndpointSuppor
t implements IHelloWorld {
13.
14. private HelloWorldImpl helloWorld;
15.
16. protected void onInit()throws ServiceException {
17. // 在 Spring 容器中获取 Bean 的实例
18. helloWorld = (HelloWorldImpl) getApplicationContext()
19. .getBean("myHelloWorldBean");
20. }
21.
22. @Override
23. public String getMessage(String name) {
24. // 执行 Bean 中的相同的方法
25. return helloWorld.getMessage(name);
26. }
27.
28.}
步骤3:配置web.xml,这个没什么好说的
Xml代码
1. <!--Spring 框架需要引入的配置文件及相关类 -->
2. <context-param>
3. <param-name>contextConfigLocation</param-name>
4. <param-value>classpath*:applicationContext.xml</param-value
>
5. </context-param>
6.
7. <servlet>
8. <servlet-name>context</servlet-name>
9. <servlet-class>
10. org.springframework.web.context.ContextLoaderServlet
11. </servlet-class>
12. <load-on-startup>1</load-on-startup>
13.</servlet>
14.
15.<!--axis 需要引入的 Servlet -->
16.<servlet>
17. <servlet-name>axis</servlet-name>
18. <servlet-class>org.apache.axis.transport.http.AxisServlet</
servlet-class>
19. <load-on-startup>2</load-on-startup>
20.</servlet>
21.
22.<!--axis 的 Web Service 的 Web 发布路径 -->
23.<servlet-mapping>
24. <servlet-name>axis</servlet-name>
25. <url-pattern>/services/*</url-pattern>
26.</servlet-mapping>
步骤4:配置server-config.wsdd
Xml代码
1. <deployment xmlns=/axis/wsdd/
2. xmlns:java="/axis/wsdd/providers/java">
3.
4. <handler name="URLMapper" type="java:org.apache.axis.han
dlers.http.URLMapper"/>
5.
6. <!-- 系统服务 -->
7. <service name="AdminService" provider="java:MSG">
8. <parameter name="allowedMethods" value="AdminServ
ice" />
9. <parameter name="enableRemoteAdmin" value="false"
/>
10. <parameter name="className" value="org.apache.axi
s.utils.Admin" />
11. <namespace>/axis/wsdd/</name
space>
12. </service>
13.
14. <service name="Version" provider="java:RPC">
15. <parameter name="allowedMethods" value="getVersio
n" />
16. <parameter name="className" value="org.apache.axi
s.Version" />
17. </service>
18.
19. <!-- 自定义服务 -->
20. <service name="myWebService" provider="java:RPC">
21. <parameter name="className"
22. value="com.webservice.axis.test.HelloWorldWebSer
vice" />
23. <parameter name="allowedMethods" value="*" />
24. <parameter name="scope" value="request" />
25. </service>
26.
27. <transport name="http">
28. <requestFlow>
29. <handler type="URLMapper" />
30. </requestFlow>
31. </transport>
32.
33.</deployment>
步骤5:配置applicationContext
Xml代码
1. <beans xmlns ="/schema/beans"
2. xmlns:xsi ="/2001/XMLSchema-instance"
3. xmlns:aop ="/schema/aop"
4. xmlns:tx="/schema/tx"
5. xsi:schemaLocation ="/schema/
beans
6. /schema/beans/spring-beans-2.
0.xsd
7. /schema/aop
8. /schema/aop/spring-aop-2.0.xs
d
9. /schema/tx
10. /schema/tx/spring-tx-2.5.xsd"
>
11.
12. <bean id="myHelloWorldBean" class="com.webservice.axis.test
.HelloWorldImpl">
13. <property name="helloStr" value="Say Hello to :" />
14. </bean>
15.
16.</beans>
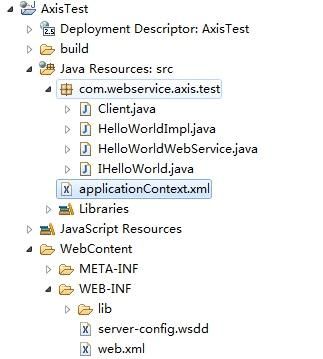
项目目录为:
这样服务就发布了,你可以访问http://localhost:8080/AxisTest/services/myWebService或者访问http://localhost:8080/AxisTest/services/myWebService?wsdl来查看生成的myWebService.wsdl文件
有几点想和大家讨论一下:
第一:
在HelloWorldWebService 中helloWorld是通过下面一句,实现注入的,个人感觉不是很优雅
Java代码

1. helloWorld = (HelloWorldImpl) getApplicationContext().getBean(
"myHelloWorldBean");
于网上查了不少资料,有一种说法是在server-config.wsdd中将配置改成
Xml代码

1. <!-- 自定义服务 -->
2. <service name="myWebService" provider="java:SPRING">
3. <parameter name="className" value="Spring中Bean的
名字" />
4. <parameter name="allowedMethods" value="*" />
5. <parameter name="scope" value="request" />
6. </service>
但是这样做会出异常,查了一些资料得知provider的服务类型有4种:RPC、Document、Wrapped和Message,是org.apache.axis.providers包中的API提供的支持,不清楚上面java:SPRING是怎么出来的,或许是我哪里配错了?
第二、当访问http://localhost:8080/AxisTest/services/myWebService.wsdl时,会出现警告
警告: The class com.webservice.axis.test.IHelloWorld does not contain a default constructor, which is a requirement for a bean class. The class cannot be converted into an xml schema type. An xml schema anyType will be used to define this class in the wsdl file.
目前解决方法是将HelloWorldWebService中的helloWorld私有变量声明称HelloWorldImpl类型,为什么有这种情况不得而知,如果哪位牛人经过指点迷津。
第三、就是用JDK6自带的一个WSImport工具根据wsdl生成客户端代码,具体的操作如下:
1、首先要交代WSImport.exe的位置,他在JDK安装目录的bin文件下,cmd可以直接使用%JAVA_HOME%"\bin\WSImport调用
2、打开cmd命令行,输入指令wsimport -s filePath
http://localhost:8080/AxisTest/services/myWebService.wsdl
说明: wsimport -s 生成代码保存路径 wsdl文件路径 详情参见/downmoon/archive/2010/08/29/330136.html
在com同级目录下运行如下命令
%AXIS2_HOME%\bin\java2wsdl -cp . -cn com.esoon.Hello -of Hello.wsdl 然后会生成一个文件Hello.wsdl
wsdl2java 用于根据WSDL生成相应的服务端和客户端代码的生成工具。
命令行格式为:WSDL2Java [options] -uri <url or path> : A url or path to a WSDL 其中常用的options具体如下:
-o <path> : 指定生成代码的输出路径
-a : 生成异步模式的代码
-s : 生成同步模式的代码
-p <pkg> : 指定代码的package名称
-l <languange> : 使用的语言(Java/C) 默认是java
-t : 为代码生成测试用例
-ss : 生成服务端代码 默认不生成
-sd : 生成服务描述文件 services.xml,仅与-ss一同使用
-d <databinding> : 指定databingding,例如,adb,xmlbean,jibx,jaxme and jaxbri -g : 生成服务端和客户端的代码
-pn <port_name> : 当WSDL中有多个port时,指定其中一个port
-sn <serv_name> : 选择WSDL中的一个service
-u : 展开data-binding的类
-r <path> : 为代码生成指定一个repository
-ssi : 为服务端实现代码生成接口类
-S : 为生成的源码指定存储路径
-R : 为生成的resources指定存储路径
--noBuildXML : 输出中不生成build.xml文件
--noWSDL : 在resources目录中不生成WSDL文件 --noMessageReceiver : 不生成MessageReceiver类
-
spring总结
1接口介绍1.1IobjectFactoryIObjectFactory是初始化、配置及管理对象的实际容器(按:它是所有容器的父接…
-
spring总结
Spring春天Spring主要的两个功能:IOC控制反转/依赖注入AOP面向方面变成Spring是完全面向接口的设计,主要管理H…
-
Spring总结
SpringSpring基本配置1.spring的依赖包配置a)SPRING_HOME/dist/spring.jarb)SPRI…
-
Spring总结之事务管理
传统的J2EE应用中,事务管理是跟EJB绑定在一起来的,那个时候大部分人使用EJB的LocalSLSB仅仅是为了使用它的声明式事务…
-
spring总结
Springbeanfactory:?BeanFactory是产生和管理bean的容器?Tomcat可以看成是一个bean的容器S…
-
20xxJava程序员工作总结报告
20xx年我的工作总结光阴如梭,半年的工作转瞬即将成为历史,伴随着新年钟声的临近,我们依依惜别硕果累累的20xx年,满怀热情的迎来…
-
java软件实习生月度总结
工作总结来公司已近一个月时间,在这一个月里,工作大致如下:第一周的时间主要是了解了公司的相关技术,学习了javaFX和JSF的相关…
-
java工程师20xx年度工作总结
20xx年度工作总结20xx年对于我来说是非常重要的一年,在这一年中我有了很多的进步,也在在很多地方留下了一些遗憾。古人云:“前事…
-
java标签总结
Jsp标准动作jsp:useBeanjsp:setPropertyjsp:getPropertyjsp:forwardjsp:us…
-
Java课设工作的总结
面向对象程序设计课程设计工作的总结历时两周的面向对象程序设计课程设计圆满完成。由于提前对课设进行了精心的准备和布置,使得学生能在短…
-
spring总结
《Spring从入门到精通》的总结第一部分Spring入门第一章Spring概述总体上讲解了Spring框架第二章开始Spring…