白盒测试和黑盒测试实验报告
软件质量保证与测试
实验指导
计算机工程学院
测试环境配置
1.setting Junit
(1) start Eclipse
Select windows-preferences-java-build path –class path variables
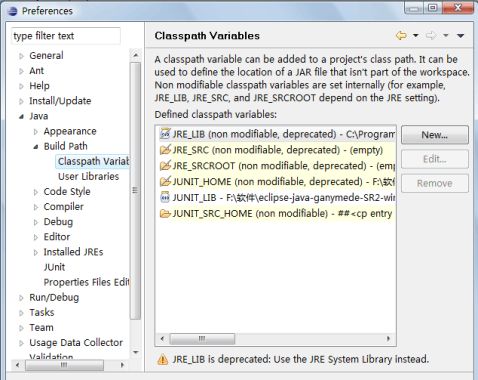
(2) click new, the figure of new variable entry is shown.
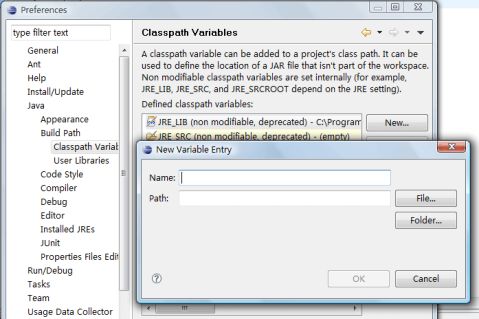
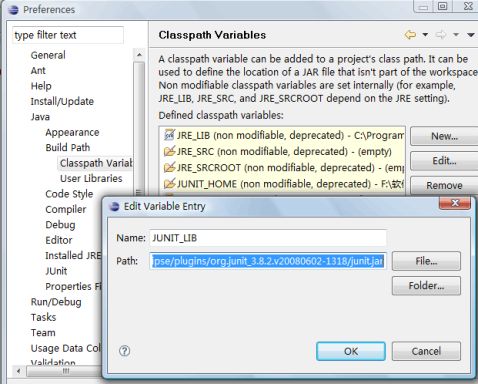
(3) name JUNIT_LIB
select file-选择JUnit 插件所对应的JAR文件所在地,在Eclipse的安装目录的plugins目录中
2.JUNIT的组成框架
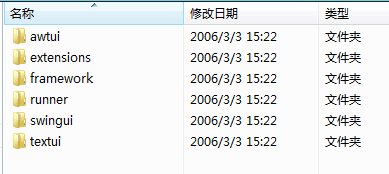
其中,junit.framework 和junit.runner是两个核心包。
junit.framework 负责整个测试对象的框架
junit.runner 负责测试驱动
Junit的框架又可分为:
A、被测试的对象。
B、对测试目标进行测试的方法与过程集合,可称为测试用例(TestCase)。
C、测试用例的集合,可容纳多个测试用例(TestCase),将其称作测试包(TestSuite)。
D、测试结果的描述与记录。(TestResult) 。
E、每一个测试方法所发生的与预期不一致状况的描述,称其测试失败元素(TestFailure)
F、JUnit Framework中的出错异常(AssertionFailedError)。
JUnit框架是一个典型的Composite模式:TestSuite可以容纳任何派生自Test的对象;当调用TestSuite对象的run()方法是,会遍历自己容纳的对象,逐个调用它们的run()方法。
3.JUnit中常用的接口和类
Test接口——运行测试和收集测试结果
Test接口使用了Composite设计模式,是单独测试用例(TestCase),聚合测试模式(TestSuite)及测试扩展(TestDecorator)的共同接口。
它的public int countTestCases()方法,它来统计这次测试有多少个TestCase,另外一个方法就是public void run( TestResult ),TestResult是实例接受测试结果, run方法执行本次测试。
TestCase抽象类——定义测试中固定方法
TestCase是Test接口的抽象实现,(不能被实例化,只能被继承)其构造函数TestCase(string name)根据输入的测试名称name创建一个测试实例。由于每一个TestCase在创建时都要有一个名称,若某测试失败了,便可识别出是哪个测试失败。
TestCase类中包含的setUp()、tearDown()方法。setUp()方法集中初始化测试所需的所有变量和实例,并且在依次调用测试类中的每个测试方法之前再次执行setUp()方法。tearDown()方法则是在每个测试方法之后,释放测试程序方法中引用的变量和实例。
开发人员编写测试用例时,只需继承TestCase,来完成run方法即可,然后JUnit获得测试用例,执行它的run方法,把测试结果记录在TestResult之中。
Assert静态类——一系列断言方法的集合
Assert包含了一组静态的测试方法,用于期望值和实际值比对是否正确,即测试失败,Assert类就会抛出一个AssertionFailedError异常,JUnit测试框架将这种错误归入Failes并加以记录,同时标志为未通过测试。如果该类方法中指定一个String类型的传参则该参数将被做为AssertionFailedError异常的标识信息,告诉测试人员改异常的详细信息。
JUnit 提供了6大类31组断言方法,包括基础断言、数字断言、字符断言、布尔断言、对象断言。
其中assertEquals(Object expcted,Object actual)内部逻辑判断使用equals()方法,这表明断言两个实例的内部哈希值是否相等时,最好使用该方法对相应类实例的值进行比较。而assertSame(Object expected,Object actual)内部逻辑判断使用了Java运算符“==”,这表明该断言判断两个实例是否来自于同一个引用(Reference),最好使用该方法对不同类的实例的值进行比对。asserEquals(String message,String expected,String actual)该方法对两个字符串进行逻辑比对,如果不匹配则显示着两个字符串有差异的地方。ComparisonFailure类提供两个字符串的比对,不匹配则给出详细的差异字符。
TestSuite测试包类——多个测试的组合
TestSuite类负责组装多个Test Cases。待测得类中可能包括了对被测类的多个测试,而TestSuit负责收集这些测试,使我们可以在一个测试中,完成全部的对被测类的多个测试。
TestSuite类实现了Test接口,且可以包含其它的TestSuites。它可以处理加入Test时的所有抛出的异常。
TestSuite处理测试用例有6个规约(否则会被拒绝执行测试)
A 测试用例必须是公有类(Public)
B 测试用例必须继承与TestCase类
C 测试用例的测试方法必须是公有的( Public )
D 测试用例的测试方法必须被声明为Void
E 测试用例中测试方法的前置名词必须是test
F 测试用例中测试方法无任何传递参数
TestResult结果类和其它类与接口
TestResult结果类集合了任意测试累加结果,通过TestResult实例传递每个测试的Run()方法。TestResult在执行TestCase时如果失败会异常抛出
TestListener接口是个事件监听规约,可供TestRunner类使用。它通知listener的对象相关事件,方法包括测试开始startTest(Test test),测试结束endTest(Test test),错误,增加异常addError(Test test,Throwable t)和增加失败addFailure(Test test,AssertionFailedError t)
TestFailure失败类是个“失败”状况的收集类,解释每次测试执行过程中出现的异常情况。其toString()方法返回“失败”状况的简要描述
4.利用Junit开发一个简单的Java程序
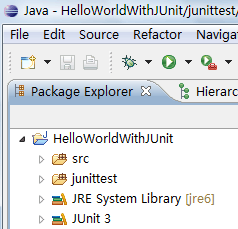
(1)File-new-Java project,名称为“HelloWorldWithJUnit”
建立两个文件夹,分别为src和junittest
src 存放实现主要功能的文件
junittest 存放测试功能文件
(2)创建测试类
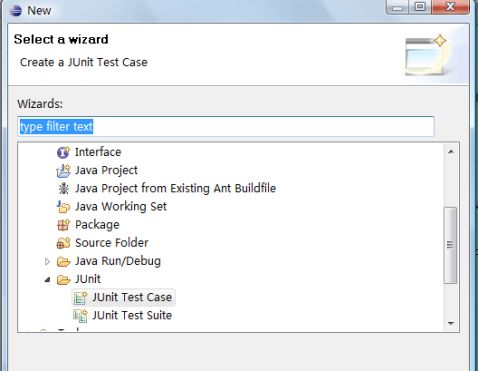
选中“HelloWorldWithJUnit”项目中的junittest包文件夹,右键并选择new-other-Junit-Junit Test Case
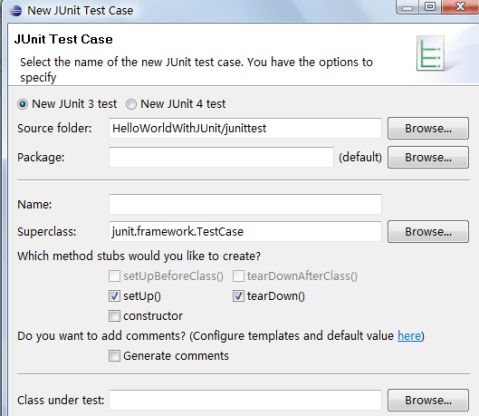
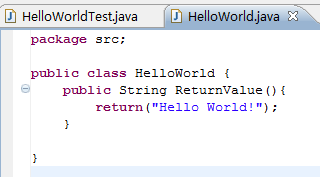
(3)选择“next”,在New Junit Test Case中的name中输入“HelloWorldTest”,在package中输入“junittest”,然后单击“finish”。
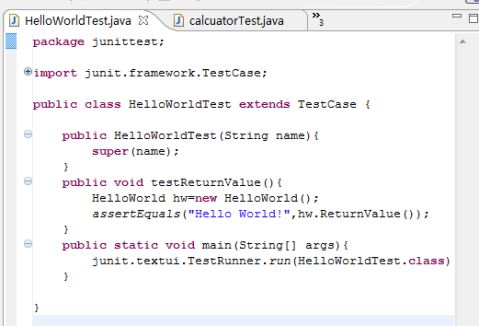
(4)现在初步计划被测试文件功能非常简单,只有一个方法ReturnValue,作用是返回“HelloWorld”,所以测试类中有对ReturnValue这个方法进行测试的类。当然,测试要能进行,该测试类必须为主类,存在main方法。HelloWorldTest.java的源代码如下:
选择run-run as-Junit test
弹出一个Junit窗口,发现在该窗口中有一个红条,这说明存在错误。
(5)创建HelloWorld类
建立一个HelloWorld类,并输入以下代码:
(6)在HelloWorldTest.java中加入import src.*;
此时以Junit测试的方式来运行HelloWorldTest.java,出现了含有绿色的窗口,测试成功。
assertEquals
public static void assertEquals([java.lang.String message],
java.lang.Object expected,
java.lang.Object actual)
Asserts that two objects are equal. If they are not, an AssertionError is thrown with the given message. If expected and actual are null, they are considered equal.
Parameters:
message - the identifying message for the AssertionError (null okay)
expected - expected value
actual - actual value
assertFalse
public static void assertFalse(java.lang.String message,
boolean condition)
Asserts that a condition is false. If it isn't it throws an AssertionError with the given message.
Parameters:
message - the identifying message for the AssertionError (null okay)
condition - condition to be checked
assertTrue
public static void assertTrue(java.lang.String message,
boolean condition)
Asserts that a condition is true. If it isn't it throws an AssertionError with the given message.
Parameters:
message - the identifying message for the AssertionError (null okay)
condition - condition to be checked
assertNull
public static void assertNull(java.lang.String message,
java.lang.Object object)
Asserts that an object is null. If it is not, an AssertionError is thrown with the given message.
Parameters:
message - the identifying message for the AssertionError (null okay)
object - Object to check or null
assertNotNull
public static void assertNotNull(java.lang.String message,
java.lang.Object object)
Asserts that an object isn't null. If it is an AssertionError is thrown with the given message.
Parameters:
message - the identifying message for the AssertionError (null okay)
object - Object to check or null
assertSame
public static void assertSame([java.lang.String message],
java.lang.Object expected,
java.lang.Object actual)
Asserts that two objects refer to the same object. If they are not, an AssertionError is thrown with the given message.
Parameters:
message - the identifying message for the AssertionError (null okay)
expected - the expected object
actual - the object to compare to expected
assertNotSame
public static void assertNotSame(java.lang.String message,
java.lang.Object unexpected,
java.lang.Object actual)
Asserts that two objects do not refer to the same object. If they do refer to the same object, an AssertionError is thrown with the given message.
Parameters:
message - the identifying message for the AssertionError (null okay)
unexpected - the object you don't expect
actual - the object to compare to unexpected
fail
public static void fail(java.lang.String message)
Fails a test with the given message.
Parameters:
message - the identifying message for the AssertionError (null okay)
See Also:
AssertionError
实验一 白盒测试方法
一、实验目的
1、掌握白盒测试基本技术,并能够应用白盒测试技术设计测试用例
2、掌握白盒测试中的逻辑覆盖和路径测试方法
二、实验任务
使用白盒测试方法为下面的程序设计测试用例(使用逻辑覆盖和路径测试方法):
程序要求:10个铅球中有一个假球(比其他铅球的重量要轻),用天平三次称出假球。
程序设计思路:第一次使用天平分别称5个球,判断轻的一边有假球;拿出轻的5个球,取出其中4个第二次称,两边分别放2个球:如果两边同重,则剩下的球为假球;若两边不同重,拿出轻的两个球称第三次,轻的为假球。
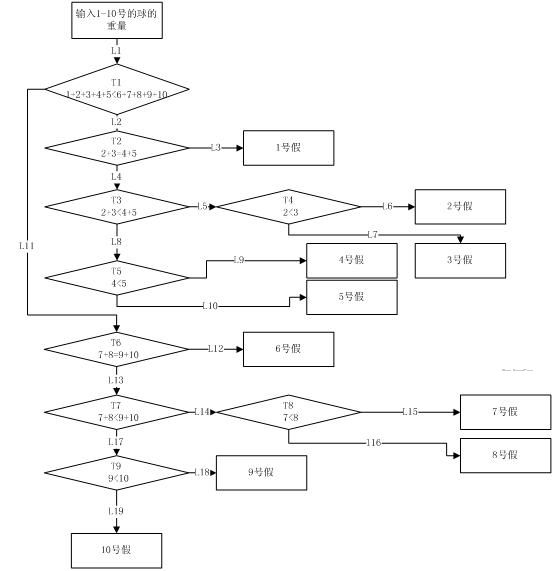
图1 判断假球的程序流程图
三、实验要求
1、做好实验预习,掌握并熟悉本实验中所使用的测试环境及相应的测试软件
2、写出实验报告,内容是:
(1)实验目的
(2)实验内容 实验源代码(或测试脚本)可不写出,但是一定要写出实验中出现的错误,以及解决错误的方法
(3)出错信息及处理方法
(4)实验结果,包括实验处理结果和设计心得。
单元测试覆盖率-使用Clover
Clover是对单元测试覆盖率进行统计的软件,在Eclipse中使用Clover,首先使用从http://www.cenqua.com/download.jspa下载Clover,还需要申请一个license,否则无法使用。目前免费下载的基本都是30天试用版。
下载后把Clover压缩包里的两个文件夹,features和plugins,复制到Eclipse安装目录中替换原来的两个文件夹。
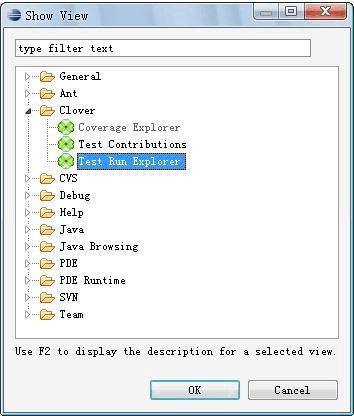
1. 打开Eclipse,从Window->Show view->other,可以看到Clover的信息:
2.还需要导入clover.license。从Preferences->Clover->License进入:
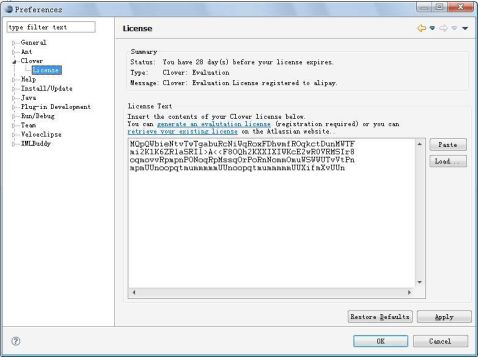
并将申请到的的license粘帖到这里,至此Clover已经安装完成,开始进入单元测试。
3. 可以对之前已经做过的project进行覆盖率的计算。也可新建了一个project,结构如下:
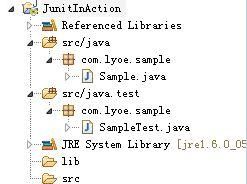
Sample.java和SampleTest.java内容分别是:
Java代码
1.package com.lyoe.sample;
2.
3.public class Sample {
4. public Integer add(Integer a, Integer b) {
5. if (a == null || b == null) {
6. return null;
7. }
8. Integer sum = new Integer(a.intValue() + b.intValue());
9. return sum;
10. }
11.}
package com.lyoe.sample;
public class Sample {
public Integer add(Integer a, Integer b) {
if (a == null || b == null) {
return null;
}
Integer sum = new Integer(a.intValue() + b.intValue());
return sum;
}
}
Java代码
1.package com.lyoe.sample;
2.
3.import com.lyoe.sample.Sample;
4.import junit.framework.TestCase;
5.
6.public class SampleTest extends TestCase {
7.
8. protected void setUp() throws Exception {
9. super.setUp();
10. }
11.
12. public void testAdd() {
13. Sample sample = new Sample();
14. Integer a = new Integer(1);
15. Integer b = new Integer(2);
16. Integer c = sample.add(a, b);
17. assertNotNull(c);
18. }
19.
20. protected void tearDown() throws Exception {
21. super.tearDown();
22. }
23.
24.}
package com.lyoe.sample;
import com.lyoe.sample.Sample;
import junit.framework.TestCase;
public class SampleTest extends TestCase {
protected void setUp() throws Exception {
super.setUp();
}
public void testAdd() {
Sample sample = new Sample();
Integer a = new Integer(1);
Integer b = new Integer(2);
Integer c = sample.add(a, b);
assertNotNull(c);
}
protected void tearDown() throws Exception {
super.tearDown();
}
}
右击JunitInAction工程,选择Properties->Clover。上面有一个Enable Clover in this project,勾上,apply->OK.
从Window->Show view->other进入,找到Coverage Explorer,打开,看到Clover选项的相关信息:

点击红框内的按钮,会弹出重新构建工程的提示,点击"是"即可。
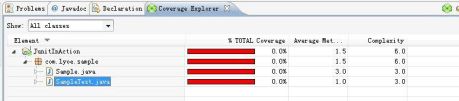
在Coverage Explorer界面下,我们会看到:
右击SampleTest.java,选择Run as->JUnit Test,结果如下:
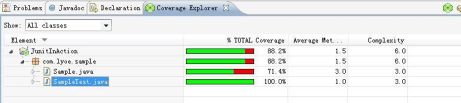
可以看到Sample.java的覆盖率为71.4%.
Clover还可以生成三种测试报告:PDF/HTML/XML。按钮可以在Coverage Explorer那排的选项按钮里找到(run new report)。
实验二 黑盒测试
一、实验目的
1、掌握黑盒测试基本技术,并能够应用黑盒测试方法设计测试用例
2、熟悉黑盒测试中的等价类测试方法和边界值测试方法。
二、实验任务
使用等价类方法设计下面程序的设计用例:
输入三个整数作为边,分别满足一般三角形、等腰三角形和等边三角形。
三、实验内容和步骤
1、使用等价类划分法设计下面的测试用例:
(1)源程序
|
package p1; import java.io.*; public class JTriangle { private int b,c,a; private static int x1,x2,x3; private static String s1,s2,s3; public void setA(int a){ this.a=a; } public void setB(int b){ this.b=b;} public void setC(int c){ this.c=c; } public boolean IsTriangle(){ if(a+b>c&&a+c>b&&b+c>a&&a!=0&&b!=0&&c!=0) return true; else return false; } public JTriangle(){
} public JTriangle(int _a,int _b,int _c){
setA(_a); setB(_b); setC(_c); } public String JudgeTriangle() { if(IsTriangle()) {
if(a==b&&a==c) { return "等边三角形"; } else if(a==b||b==c||a==c){ return "等腰三角形"; } else { return "一般三角形"; } } else return "不能组成三角形"; } public boolean ISNumble(String s) { if(s.length()==0){ return false; } else{ char ch[]=s.toCharArray();
for(int i=0;i<ch.length;i++) { if(ch[i]>='0'&&ch[i]<='9') continue; else return false; }
return true; } } public void SetTriangle(){ try { BufferedReader in=new BufferedReader(new InputStreamReader(System.in)); System.out.println("请输入三角形的三边:"); System.out.println("a= "); s1=in.readLine();
while(!ISNumble(s1)){ System.out.println("你输入的不是个数字"); System.out.println("a= "); s1=in.readLine(); } System.out.println("b= "); s2=in.readLine(); while(!ISNumble(s2)){ System.out.println("你输入的不是个数字"); System.out.println("b= "); s2=in.readLine(); } System.out.println("c= "); s3=in.readLine(); while(!ISNumble(s3)){ System.out.println("你输入的不是个数字"); System.out.println("C= "); s3=in.readLine(); } } catch(IOException e) {} x1=Integer.parseInt(s1); x2=Integer.parseInt(s2); x3=Integer.parseInt(s3);
setA(x1); setB(x2); setC(x3); } public static void main(String args[]) { JTriangle tr=new JTriangle(); tr.SetTriangle(); System.out.print(tr.JudgeTriangle()) ; } } |
(2)测试用例设计

四、实验要求
1、做好实验预习,写出使用边界值方法设计的测试用例,掌握并熟悉本实验中所使用的测试环境及相应的测试软件
2、写出实验报告,内容是:
(1)实验目的
(2)实验内容 实验源代码(或测试脚本)可不写出,但是一定要写出实验中出现的错误,以及解决错误的方法
(3)出错信息及处理方法
(4)实验结果,包括实验处理结果和设计心得。
-
白盒测试实验报告
实验报告课程:软件测试实验项目:白盒测试用例设计与执行专业年级:计科07级姓名:**学号:***指导教师:实验时间:20**-6-…
-
白盒测试实验报告范本
实验一白盒软件测试一实验目的通过简单程序白盒测试熟悉测试过程对软件测试行程初步了解并养成良好的测试习惯熟练掌握如何运用基路径测试方…
-
白盒测试实验报告
关于三角形问题的白盒测试实验报告一实验目的1能熟练应用功能性测试技术进行测试用例设计2对测试用例进行优化设计二实验内容1题目内容描…
-
白盒测试实验报告
《软件测试技术》实验报告实验序号:03实验项目名称:使用基本路径覆盖法测试自动售货机程序附件:修改后的实现代码:packagete…
-
软件测试白盒测试实验报告
三角形判定1题目内容描述输入三条边进行三角形的判定2测试用例的编写测试用例参照三角形的组成规则编写根据两边之和大于第三边的规则编写…
-
软件测试报告模板
软件测试报告模板此页为模板文档本身的版本控制记录表按模板生成的正式文档中不需要此页秘密XXXXXX软件项目系统测试报告软件测试部2…
- 软件项目测试报告
-
软件测试报告
测试分析报告项目名称:企业一级库库存管理系统项目负责人***编写校对审核单位:092012班第9小组20xx年11月2日系统设计与…
-
软件测试实验报告(测试计划+黑盒测试+白盒测试)
河北民族师范学院软件测试课程设计报告题目最大公约数和最小公倍数姓名班级学号指导老师20xx109目录第1章软件测试的概念和设计要求…
-
黑盒测试实验报告.
软件质量保证与测试20xx春季教师蒲蔚实验报告1黑盒测试学号20xx141463245姓名柳阳1引言黑盒测试也称功能测试它是通过测…
-
软件测试实验报告
软件测试实验报告万继王20xx1081147任课教师贾春花班级20xx级计科1班实验目的计算机在生活中的普遍计算机已经成为我们生活…