免疫沉淀IP
免疫沉淀(Immunoprecipitation, IP)原理
IP是利用抗原蛋白质和抗体的特异性结合以及细菌蛋白质的“protein A/G"特异性地结合到抗体(免疫球蛋白)的FC片段的现象开发出来的方法。目前多用protein A/G预先结合在argarose beads上,使之与含有抗原的溶液及抗体反应后,beads上的prorein A/G就能达到吸附抗原的目的。通过低速离心,可以从含有目的抗原的溶液中将目的抗原与其它抗原分离。
免疫沉淀实验的操作步骤比较多,同时由于在非变性条件下进行实验,所以要得到一个完美的实验结果,不仅需要高质量的抗体,同时对免疫沉淀体系也需要有严格的控制指标。免疫沉淀实验从:蛋白样品处理;抗体-agarose beads孵育;抗体-agarose beads复合物洗涤到最后的鉴定,每步都非常关键,需要严格控制实验流程中每个关键步骤的质量,才能最终达到你的实验目的。
IP实验步骤
基本实验步骤
(1)收获细胞,加入适量细胞IP裂解缓冲液(含蛋白酶抑制剂),冰上或者4℃裂解30min, 12,000g离心30 min后取上清;
(2) 取少量裂解液以备Western blot分析,剩余裂解液将1μg相应的抗体和10-50 μl protein A/G-beads加入到细胞裂解液,4°C缓慢摇晃孵育过夜;
(3)免疫沉淀反应后,在4°C 以3,000 g速度离心5 min,将protein A/G-beads离心至管底;将上清小心吸去,protein A/G-beads用1ml裂解缓冲液洗3-4次;最后加入15μl的2×SDS 加样缓冲液,沸水煮10分钟;
(4)SDS-PAGE, Western blotting或进行质谱分析。
一、 样品处理:
免疫沉淀实验成功与否,第一步处理样品非常关键。免疫沉淀实验本质上是处于天然构象状态的抗原和抗体之间的反应,而样品处理的质量决定了抗原抗体反应中的抗原的质量,浓度以及抗原是否处于天然构象状态。所以制备高质量的样品以用于后续的抗体-agarose beads孵育对免疫沉淀实验是否成功非常关键。在这个环节中,除了要控制所有操作尽量在冰上或者4°完成外,最为关键的是裂解液的成份。
用于免疫沉淀实验的样品一般是原代培养细胞裂解液或者细胞系裂解液。我们以常用的RIPA裂解液为例(主要含有pH7.4左右的离子缓冲液,接近生理浓度下的NaCl,一定比例的去垢剂和甘油以及各类蛋白酶抑制剂等)来说明其各主要成份的用途,进而帮助我们如何针对不同的实验目的和不同的蛋白质特性来选择最佳的裂解液。
a缓冲液:离子缓冲液常采用pH7.4的Hepes或者Tris-Cl。
b NaCl浓度一般习惯用150 mM,这主要是因为150 mM接近生理浓度,不会破坏蛋白质之间的相互作用。然而细胞内部的NaCl浓度并不是均一的,局部NaCl的浓度可以低到50 mM,150 mM的NaCl有可能会破坏这个区域的蛋白质相互作用。因此裂解液配方最佳的NaCl浓度要视所分析的蛋白的亚细胞定位而定。
c甘油由于其粘性,可以对蛋白质之间的相互作用起到一个很好的保护作用。一般添加10%的甘油有助于稳定蛋白质之间的相互作用。
d裂解液中的去垢剂可以裂解细胞质膜,也同时破坏了许多细胞器的膜,从而释放了其中储存的许多蛋白酶。而由于用于免疫沉淀实验的去垢剂作用比较温和,因此蛋白酶的活性大部分得以保存。还有一部分蛋白酶来自胞质中,主要由于其抑制蛋白或者其活性抑制环境受到
改变后从而恢复了蛋白酶活性。因此,添加蛋白酶抑制剂对于防止目的蛋白的降解从而完成免疫沉淀实验非常关键。一般主要通过添加EDTA抑制金属蛋白酶,通过Protease Cocktail(多种蛋白酶抑制剂混合物)可以抑制蛋白酶。
e去垢剂对于免疫沉淀实验尤其是免疫共沉淀实验是一个非常关键的因素。不同的去垢剂种类和不同的去垢剂浓度主要通过影响以下三个因素来影响免疫沉淀效果:
细胞质/器膜的通透性:因为许多目的蛋白都定位在细胞器中,所以必须先将这些蛋白释放出来,抗体才能与之反应。
膜蛋白的释放:许多膜蛋白的构象对去垢剂种类和浓度非常敏感,因此针对这类蛋白的免疫沉淀实验,需要谨慎地尝试多种去垢剂以及不同浓度。
蛋白相互作用:不同去垢剂对不同性质的蛋白质的相互作用影响程度不一样,需要根据具体蛋白的特性进行分析选择去垢剂种类和浓度。而由于何种去垢剂适应作用于何种蛋白质现在很难精准预测,所以一个更为切实可行的办法就是通过具体实验筛选合适的去垢剂种类和浓度。
二、抗体-agarose beads孵育
裂解细胞,离心并去除不可溶的膜组份后,上清可以储存在-80°保存3个月,但最好能够使用新鲜制备的细胞裂解液上清去进行抗体-agarose beads孵育实验。抗体可以先加入上清中与样品孵育数小时后再加入Protein A或者G beads孵育过夜,也可以同时加入抗体和Protein A或者G beads孵育过夜。
一般选择1mg总蛋白(1mg/ml)对应添加1 ug抗体,最高可以添加至5 ug抗体,过多的抗体会产生假阳性。这个步骤中关键因素在于选择合适的阴性对照。一般选用加同样量的IgG,但更为妥当的方法是选择针对胞内其它无关目的蛋白的一抗做对照。例如,做膜蛋白A的免疫沉淀,选择膜蛋白B来做阴性对照,只要确认二者之间没有相互作用;而做胞质可溶性蛋白C的免疫沉淀,则选择另外一个可溶性蛋白D来做阴性对照。同时,为避免Protein A或者G beads有(非)特异性吸附从而造成免疫沉淀实验结果的假阳性,一般在加入目的蛋白抗体之前,预先将Protein A或者G beads与细胞裂解液孵育数小时,然后取上清用于后续的抗体-agarose beads孵育。
同时,Protein A或者G beads对不同类型的抗体亲和力不同,结合一抗的种属和Ig亚型,选择合适的Protein A或者G beads也是决定免疫沉淀实验成功与否的一个重要因素。一般推荐使用Protein A和Protein G beads的混合物,这样可以达到最佳实验效果,而且省去了许多选择的烦恼。
三、抗体-agarose beads复合物洗涤:
除了选择特异性好的抗体以及选择合适的阴性对照外,去除免疫沉淀实验非特异性的一个办法是对抗体-agarose beads复合物进行多次洗涤。一般洗涤缓冲液使用和裂解液一样的配方,但去除甘油,以减少由于甘油的粘性带来的非特异性吸附。针对不同的实验要求,还可以通过更改NaCl的浓度以及去垢剂的比例,种类来达到去除非特异性吸附的效果。例如,针对单纯的免疫沉淀而非免疫共沉淀实验或者虽然是进行免疫共沉淀实验,但蛋白质之间的结合比较牢靠,可以考虑使用低浓度(0.2-0.5%)的SDS洗涤抗体-agarose beads复合物,这样可以去除绝大部分非特异性相互作用。
四、 鉴定
免疫沉淀实验用途非常广泛(见IP: Q&A),而且基于最基本的免疫沉淀实验衍生出了许多免疫沉淀相关实验手段(比如免疫共沉淀,染色质免疫沉淀和RNA-蛋白免疫沉淀),因此,免疫沉淀实验的鉴定方法主要视实验目的而定。
我们在本手册中主要简单概述常见的免疫沉淀之后的WB检测需要注意的实验环节。由于免疫沉淀实验使用目的蛋白抗体加Protein A/G beads与样品孵育,因此在最后离心获得抗体-agarose beads复合物后,eppendorf管中主要含有抗体,目的蛋白,Protein A/G beads以及一些其它非特异性作用蛋白。其中,抗体和目的蛋白以及Protein A/G beads三者之间是以非共价健结合在一起,只有Protein A/G与agarose beads是共价结合在一起的。因此,最后经过添加含巯基乙醇的加样缓冲液以及煮沸变性并离心出去Protein A/G beads后,eppendorf管只有抗体和目的蛋白以及少量非特异性吸附蛋白。这样SDS-PAGE中就含有目的蛋白和抗体二种蛋白,由于加样缓冲液中含有巯基乙醇从而导致抗体的重链与轻链之间的二硫键被破坏从而使得抗体分子变成重链分子(55KD)和轻链分子(25KD)。因此,WB显色反应中除了能检测到目的蛋白外,如果所使用的二抗与用于免疫沉淀实验的抗体分子属于同一种属的话,还能检测到重链和轻链分子。通常用于免疫沉淀的抗体量非常大(1ug),所以当目的蛋白的大小接近重链或者轻链分子时,重链或者轻链分子的WB信号常常由于信号过强而导致影响对目的蛋白的WB结果判断。
针对上述情况,通常有二种解决办法:
a. 选择不同种属的抗体分别进行免疫沉淀实验和WB实验,这样再选择一个种属交叉反应比较弱或者无种属交叉反应的二抗进行WB实验,就可以大大减弱重链和轻链分子的WB信号。
b. 使用交联剂将抗体和Protein A/G beads交联,然后通过添加不含巯基乙醇的加样缓冲液处理目的蛋白-抗体-agarose beads复合物,最后离心去除抗体-agarose beads复合物,上清中只留下目的蛋白。
免疫共沉淀
免疫共沉淀(Co-Immunoprecipitation)是以抗体和抗原之间的专一性作用为基础的用于研究蛋白质相互作用的经典方法。是确定两种蛋白质在完整细胞内生理性相互作用的有效方法。
其原理是:当细胞在非变性条件下被裂解时,完整细胞内存在的许多蛋白质-蛋白质间的相互作用被保留了下来。如果用蛋白质X的抗体免疫沉淀X,那么与X在体内结合的蛋白质Y也能沉淀下来。这种方法常用于测定两种目标蛋白质是否在体内结合;也可用于确定一种特定蛋白质的新的作用搭档。
其优点为:(1)相互作用的蛋白质都是经翻译后修饰的,处于天然状态;(2)蛋白的相互作用是在自然状态下进行的,可以避免人为的影响;(3)可以分离得到天然状态的相互作用蛋白复合物。缺点为:(1)可能检测不到低亲和力和瞬间的蛋白质-蛋白质相互作用;(2)两种蛋白质的结合可能不是直接结合,而可能有第三者在中间起桥梁作用; (3)必须在实验前预测目的蛋白是什么,以选择最后检测的抗体,所以,若预测不正确,实验就得不到结果,方法本身具有冒险性。
实验流程为:
(1)转染后24-48 h 可收获细胞,加入适量细胞裂解缓冲液(含蛋白酶抑制剂),冰上裂解30min, 细胞裂解液于4°C, 最大转速离心30 min后取上清;
(2)取少量裂解液以备Western blot分析,剩余裂解液加1μg相应的抗体加入到细胞裂
解液,4°C缓慢摇晃孵育过夜;
(3)取10μl protein A 琼脂糖珠,用适量裂解缓冲液洗3 次,每次3,000 rpm离心3 min;
(4)将预处理过的10μl protein A 琼脂糖珠加入到和抗体孵育过夜的细胞裂解液中4°C缓慢摇晃孵育2-4h,使抗体与protein A琼脂糖珠偶连;
(5)免疫沉淀反应后,在4°C 以3,000 rpm 速度离心3 min,将琼脂糖珠离心至管底;将上清小心吸去,琼脂糖珠用1ml裂解缓冲液洗3-4次;最后加入15μl的2×SDS 上样缓冲液,沸水煮5分钟;
(6)SDS-PAGE, Western blotting或质谱仪分析。
注意的问题:
(1)细胞裂解采用温和的裂解条件,不能破坏细胞内存在的所有蛋白质-蛋白质相互作用,多采用非离子变性剂(NP40或Triton X-100)。每种细胞的裂解条件是不一样的,通过经验确定。不能用高浓度的变性剂(0.2%SDS),细胞裂解液中要加各种酶抑制剂,如商品化的cocktailer。
(2)使用明确的抗体,可以将几种抗体共同使用
(3)使用对照抗体:
单克隆抗体:正常小鼠的IgG或另一类单抗
兔多克隆抗体:正常兔IgG
在免疫共沉淀实验中要保证实验结果的真实性,应注意以下几点:
(1) 确保共沉淀的蛋白是由所加入的抗体沉淀得到的,而并非外源非特异蛋白,单克隆抗体的使用有助于避免污染的发生;
(2) 要确保抗体的特异性,即在不表达抗原的细胞溶解物中添加抗体后不会引起共沉淀;
(3) 确定蛋白间的相互作用是发生在细胞中,而不是由于细胞的溶解才发生的,这需要进行蛋白质的定位来确定。
第二篇:Co-IP免疫共沉淀
CO-IMMUNOPRECIPITATION ANALYSIS OF
PROTEIN-PROTEIN INTERACTIONS
This protocol uses total cell extracts to analyze putative protein-protein interactions in eukaryotic cells. One can also use nuclear extracts as a source for this protocol.
1. Transfect 2-T150s of HEK293 cells with the appropriate expression vectors (protein A and protein B) as per standard protocol. Alternatively, you can use an endogenous cell line that expressed both proteins if you have specific antibodies for each protein.
2. After 48 hours, harvest cells and wash with PBS -/-
3. Transfer cells into 2 microfuge tubes and lyse each tube of cells with 1ml of: 20 mM Tris pH 7.5
100 mM NaCl
0.5% NP-40
0.5 mM EDTA
0.5 mM PMSF
0.5% protease inhibitor cocktail (Sigma)
pipet cells up and down extensively and then sit on ice for 10 minutes.
4. Spin down cell extracts at max speed for 10 minutes at 40C.
5. Pool extracts from each transfection into a 15 ml tube. For immunoprecipitation, add 10 ?l (polyclonal serum) or 10 ?gs (monoclonal antibody) to 1 ml of extract. Incubate with end-over-end mixing for 2 hours at 40C. Save 50 ?l of each cell extract and add 50 ml of 2X SDS-PAGE sample buffer and boil for 5 min.
6. Wash 50 ml of Protein A/G Sepharose (Santa Cruz Biotech) with 1 ml of lysis buffer---3 times and then remove last of excess buffer carefully.
7. After the 2 hour incubation (Step 5), add the washed Protein A/G Sepharose to the immunoprecipiates and mix end-over-end for 1 hour at 40C.
8. Wash immunoprecipitates 3X with 1 ml of lysis buffer and remove last of buffer carefully. Add 50 ?l of 2X SDS-PAGE sample buffer and boil 5 min. Load on SDS-PAGE gel as follows:
Lane 1 PAGE standards
Lane 2 protein A transfected cells
Lane 3 protein B transfected cells
Lane 4 protein A/B transfected cells
Also run a gel with just the extract (Step 5) before immunoprecipitation to
show that each cell line expresses the right protein.
9. Western blot get to Immobilon membranes (Millipore) and block in the following buffer overnight: 50 mM Tris pH 7.5
100 mM NaCl
0.1% Tween 20
5% dry milk
10. Probe the next day with the appropriate antibody combination and develop using the ECL kit (see Western blot protocol)
Co-Immunoprecipitation

The IP Principle
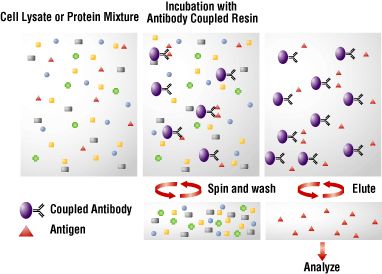
The principle of an IP is very simple (Figure 1). An antibody (monoclonal or polyclonal) against a specific target antigen is allowed to form an immune complex with that target in a sample, such as a cell lysate. The immune complex is then captured on a solid support to which either Protein A or Protein G has been immobilized (Protein A or G binds to the antibody, which is bound to its antigen). The process of capturing this complex from the solution is referred to as precipitation. Any proteins not “precipitated” by the immobilized Protein A or G support are washed away. Finally, components of the bound immune complex (both antigen and antibody) are eluted from the support and analyzed by SDS-PAGE (gel electrophoresis), often followed by Western blot detection to verify the identity of the antigen.
Traditional immunoprecipitation involves the following steps:
1. Form the antigen-antibody complex (immune complex) by incubating specific antibody
with the antigen-containing sample for 1 hour to several hours.
2. Capture the immune complex on an immobilized Protein A or Protein G agarose gel
support by incubation for 0.5-2 hours.
3. Remove any non-bound protein (non-immune complex sample components) from the
precipitated complex by washing gel support with additional sample buffer.
4. Boil gel support in reducing SDS-PAGE sample loading buffer.
5. Recover sample eluted in loading buffer from gel support and analyze by SDS-PAGE. 6. Perform Western blot analysis, probing with antigen-specific antibody.
Figure 1. Summary of a traditional immunoprecipitation procedure.
Co-IP vs. IP
Co-immunoprecipitation (Co-IP) is a popular technique for protein interaction discovery. Co-IP is conducted in essentially the same manner as an IP (Figure 2). However, in a co-IP the target antigen precipitated by the antibody “co-precipitates” a binding partner/protein complex from a lysate, i.e., the interacting protein is bound to the target antigen, which becomes bound by the
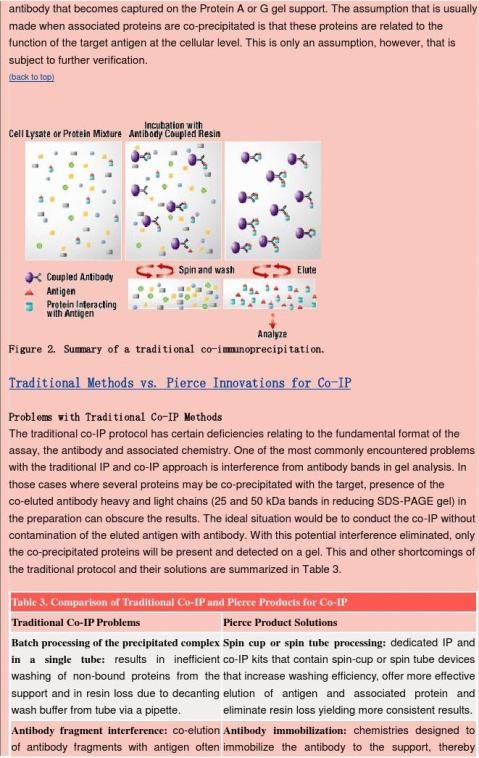
results in bands interfering with detection of allowing elution of only the target and any any co-precipitated proteins on associated proteins in a co-IP complex.
Antibody re-used: immobilization chemistry and mild
elution conditions for the target and associated
proteins allow the immobilized antibody to be
re-equilibrated and re-cycled several times in the
co-IP protocol. SDS-PAGE. Antibody sacrificed: as a consequence of harsh elution conditions, the target antibody is destroyed; antibody loss by way of the protocol can be costly.
(back to top)
Three approaches have been incorporated into several products targeted to IP and co-IP applications.
Antibody Orientation and Immobilization – Indirect Strategy
This strategy takes advantage of the binding characteristics of the traditional Immobilized Protein
A or Protein G based support combined with chemical cross-linking to covalently link the antibody to the support. Protein A and Protein G bind IgG class antibodies through the Fc region which is characterized primarily by dimerized heavy chain modified by carbohydrate. Fc region binding naturally orients the antigen binding domains of the antibody (Fab) away from the support, making them available for binding to their respective target antigen. To ensure that the antibody remains on the support during the requisite antigen binding, wash and elution steps of the protocol, this bound and oriented antibody is chemically cross-linked to the Protein A or G with the bifunctional reagent, disuccinimidyl suberate (DSS). Seize X Immunoprecipitation Kits (e.g., Product # ) incorporate this strategy. The X in the name denotes use of a cross-linking agent.
Activated Support for Antibody Immobilization – Direct Strategy
In this approach, antibody is immobilized directly through its surface amine groups (contributed primarily by the side chain epsilon-amino group of lysine) to a high capacity aldehyde activated beaded agarose support (AminoLink Plus Coupling Gel). The support forms a Schiff’s base with these available amines that is reduced to form stable secondary amine bonds during the immobilization process. The wide range of coupling conditions that can be used with this support make it ideal for maintaining biological binding activity critical to the successful execution of a co-IP experiment. ProFound Co-Immunoprecipitation Kits (Product # ) and Seize Primary Immunoprecipitation Kits (Product # ) use this direct immobilization approach. The word “Primary” in the Seize Primary IP Kit name denotes direct coupling of a primary antibody to the activated matrix. For co-IP applications, the flexibility, simplicity and durability of the direct method as an antibody coupling strategy makes it the method of choice for delivering results free from antibody interference.
Use of the Streptavidin:Biotin Interaction
This direct coupling approach incorporates the binding association between streptavidin and
biotin. Streptavidin immobilized to beaded agarose gel or coated in microplate wells provides an alternative IP or co-IP strategy for obtaining results free from antibody interference. Biotinylated antibody is bound very strongly to each matrix and is not eluted when mild conditions are used to release the target antigen. The IP/co-IP is conducted by incubating the sample with the streptavidin-biotinylated antibody loaded matrix. Elution of the target antigen and any interacting proteins is performed free of antibody contamination. ImmunoPure Immobilized Streptavidin Gel (Product #) and kit products that use this support, as well as the Seize Streptavidin Coated Plate Immunoprecipitation Kit (Product # ), provide high capacity biotin-binding matrices suitable for IP and co-IP applications.
(back to top)
Classical Immune Complex Formation vs. Pre-binding of Antibody
A change in protocol from the classical immune complex precipitation is necessary when using immobilized antibody in the co-IP method. In the traditional co-IP protocol, the immune complex (antigen:antibody) is formed in solution before “precipitating” it with the immobilized Protein A or Protein G matrix. With the antibody pre-attached to the “precipitating” matrix, the immune complex is formed directly on the matrix by incubation of the antigen-containing sample with the matrix. Formation of the immune complex (the target antigen and any target-associated protein) and its precipitation occurs in one step.
In the immobilized format, the antibody is allowed to incubate with the lysate for the specified period. With Seize X and Seize Primary IP Kits, the matrix is washed using a spin cup format and the bound protein eluted in a separate step prior to analysis. The target antigen and co-IP complex is recovered free of antibody or antibody fragment contamination, and the antibody is retained in an active form on the support to be used in another co-IP cycle.
Research conducted at Pierce indicates that, even in coated plate immunoprecipitation procedures that do not require it, pre-binding the antibody consistently results in the capture of more target antigen. This approach is recommended for the Seize Coated Plate IP Kits using 96-well microplates coated with streptavidin, Protein G or Protein A/G (Products # , respectively). Antibody is bound to the plate wells prior to the prescribed incubation with a lysate sample. Unbound protein is easily washed from the wells prior to the elution of the target and any co-IP proteins eluted.
In their review of protein interactions, Phizicky and Fields present a discussion of the issues to consider in validating a suspected interaction obtained by a co- IP experiment. Ultimately, the following question must be answered: Does the interaction detected by co-IP occur in vivo, and what significance does it have at the cellular level? A summary of Phizicky and Fields approach to verification of co-IP data follows.
Confirm that the co-precipitated protein is obtained only by antibody against the target
Use monoclonal antibodies in the co-IP protocol. When only a polyclonal antibody is available, pre-treatment of the antibody with sample devoid of the primary target (bait protein) may be required to assure that the polyclonal antibody does not contain clones or contaminants that bind prey protein(s) directly. Pre-adsorption to extracts devoid of target or pre-purification of polyclonal IP antibodies against an affinity column containing pure target antigen safeguards against a false positive co-IP.
Conclude that antibody against the target antigen does not itself recognize the co-precipitated protein(s)
Use independently derived antibodies that have demonstrated specificities against different epitopes on the target protein. Their use serves as verification that the target (bait)-directed antibodies have no affinity for the target associated prey proteins recovered during the co-IP. Alternatively, an antibody against the co-precipitated protein can be used to co-IP the same complex.
Determine if the interaction is direct or indirect
Is the interaction mediated through a third party protein that contacts both target and co-precipitated protein? Immunological and other more sophisticated methods such as mass spectrometry may be necessary to answer this question.
Determine that the interaction takes place in the cell and not as a consequence of cell lysis
Suggested approaches here involve co-localization studies and site-specific mutagenesis giving rise to mutants that perturb the binding process.
(back to top)
To return to:
?
? Protein Interaction Main page click . Protein Pathways Main page click .
Immunoprecipitation of Proteins
[Note: If using a pre-existing cell lysate, proceed directly to step 5.]
1. Wash adherent cells twice in the dish or flask with ice-cold PBS and drain off PBS. Wash non-adherent cells in PBS and centrifuge at 800 to 1000 rpm in a table-top centrifuge for 5 minutes to pellet the cells.
2. Add ice-cold modified RIPA buffer to cells (1 ml per 107 cells/100 mm dish/150 cm2 flask;
0.5 ml per 5 x 10⁶ cells/60 mm dish/75 cm2 flask).
3. Scrape adherent cells off the dish or flask with either a rubber policeman or a plastic cell scraper that has been cooled in ice-cold distilled water. Transfer the cell suspension into a centrifuge tube. Gently mix the suspension on either a rocker or an orbital shaker at 4minutes to lyse cells.
4. Centrifuge the lysate at 14,000 x g in a precooled centrifuge for 15 minutes. Immediately transfer the supernatant fraction to a fresh centrifuge tube and discard the pellet.
5. To prepare protein A or G agarose/sepharose, wash the beads twice with PBS and restore to a 50% slurry with PBS. It is recommended to cut the tip off of the pipette tip when manipulating agarose beads to avoid disruption of the beads.
6. Pre-clear the cell lysate by adding 100 microliters of either protein A or G agarose/sepharose bead slurry (50%) per 1 ml of cell lysate and incubating at 4
or sepharose when it is used later on in the assay.
7. Remove the protein A or G beads by centrifugation at 14,000 x g at 4
Transfer the supernatant to a fresh centrifuge tube.
8. Determine the protein concentration of the cell lysate, e.g. by performing a Bradford assay. Dilute the cell lysate at least 1:10 before determining the protein concentration because of the interference of the detergents in the lysis buffer with the Coomassie-based reagent.
9. Dilute the cell lysate to approximately 1mg/ml total cell protein with PBS to reduce the concentration of the detergents in the buffer. A more concentrated cell lysate (i.e., 10 mg/ml) may be necessary to immunoprecipitate a protein which is found in low levels in a cell model.
10. Add the recommended volume of the immunoprecipitating antibody (see Certificate of Analysis for detailed information) to 500 microliters (i.e., 500 micrograms) of cell lysate. The optimal amount of antibody that will quantitatively immunoprecipitate the protein of interest should be empirically determined for each cell model.
11. Gently mix the cell lysate/antibody mixture for either 2 hours or overnight at 4immunoprecipitation of active enzymes for kinase or phosphatase assays.
12. Capture the immunocomplex by adding 100 microliters protein A or G agarose/sepharose bead slurry (50 microliters packed beads) and gently rocking on either a rocker or orbital shaker for either 1 hour or overnight at 4. In many instances, immunocomplex capture can be enhanced by adding 2 micrograms of a bridging antibody (e.g., rabbit-anti-mouse IgG). This is especially important with antibodies that bind poorly to protein A such as mouse IgG1 or on a rocker or an orbital shaker. A 2 hour incubation time is recommended for the for 10 minutes. for 10 minutes on a rocker or orbital shaker. Pre-clearing the lysate will reduce non-specific binding of proteins to the agarose for 15
antibodies generated in chicken.
13. Collect the agarose/sepharose beads by pulse centrifugation (5 seconds in the microcentrifuge at 14,000 rpm). Discard the supernatant fraction and wash the beads 3 times with 800 microliters ice-cold modified RIPA buffer. Occasionally, washing with modified RIPA buffer will strip the immunocomplex from the agarose/sepharose beads. In these cases, washing with the milder PBS is recommended.
14. Resuspend the agarose/sepharose beads in 60 microliters 2 x sample buffer and mix gently. This will allow for sufficient volume to run three lanes.
15. The agarose/sepharose beads are boiled for 5 minutes to dissociate the immunocomplexes from the beads. The beads are collected by centrifugation and SDS-PAGE is performed with the supernatant fraction. Alternatively, the supernatant fraction can be transferred to a fresh microcentrifuge tube and stored frozen at -20 for later use. Frozen supernatant fractions should be reboiled for 5 minutes directly prior to loading on a gel.
-
20xx年小学二年级班主任工作总结
20xx小学二年级班主任工作总结二年级下学期工作在不知不觉中过去了,一个学年也许只是微不足道的一小段,然而对于一年级的学生来说,无…
-
九年级语文教学工作总结
钟瑞芳本学期我担任初三(2)班的语文教学工作,学生面临升学考试的压力,在重大责任面前为优化下学期教学,现将本学期工作总结如下:一、…
-
小学二年级上册语文教学工作总结[1]
小学二年级语文上册教学总结法那小学:彭宇娟随着期末的临近,本学期我的语文教学工作也即将接近尾声,回顾自己一学期的语文教学工作,感觉…
-
两有生帮扶工作总结
教书人都知道,现如今厌学的学生随着学段上升而攀升。老师心里也明白:好学生无需老师多花时间、精力,事实上,老师的辛苦是为大部分学生而…
-
班团队工作总结
班团队工作总结今天的儿童作为21世纪的主人,必将担负起实现中华民族的伟大复兴,这就不仅要求我们的学生不仅要有良好的科学文化知识,同…