Android实验报告模板_实验三
电子信息学院
实验报告书
课程名:《操作系统原理》
题 目: 实验三 Android的控制层开发
实验类别: 【验证、设计】
班 级:
学 号:
姓 名:

1、 实验题目
Android的控制层开发
2、实验目的与要求
(1)实验目的:
本次实验的目的是让同学熟悉Intent和Activity的使用。了解利用Intent实现进程间的通信,学会利用Intent进行Activity的跳转,以及链接网页信息。
(2)实验要求:
1. 熟悉Intent与Activity的使用;
2. 掌握Activity启动另一个Activity的方法;
3. 会使用Intent对象进行Activity间意图的传达。
3、实验步骤与源程序
(1)新建First.java 和Second.java


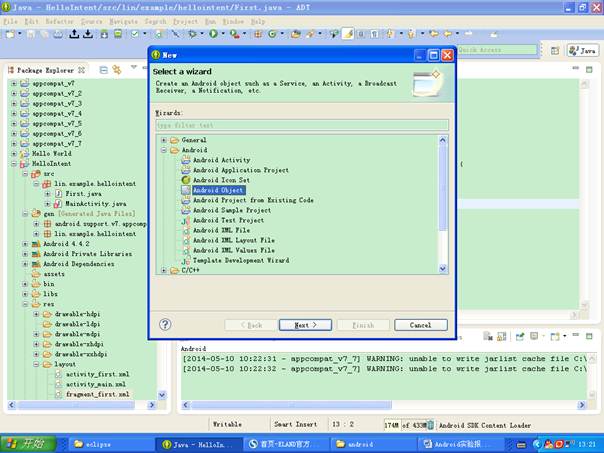


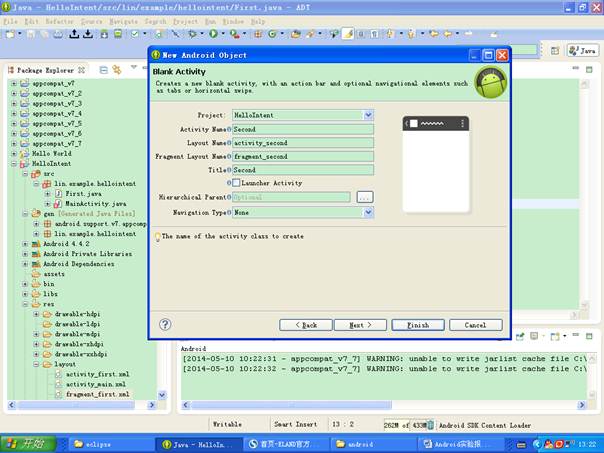
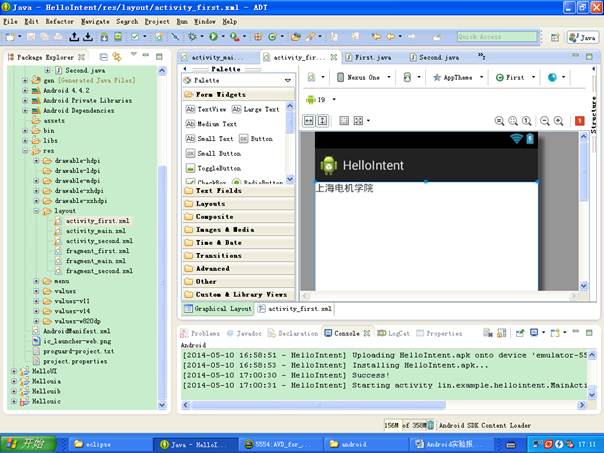
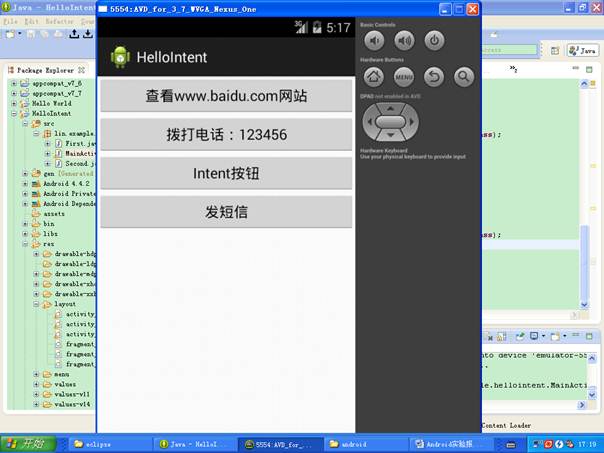
(2)整个工程的结构为:


(3)java代码
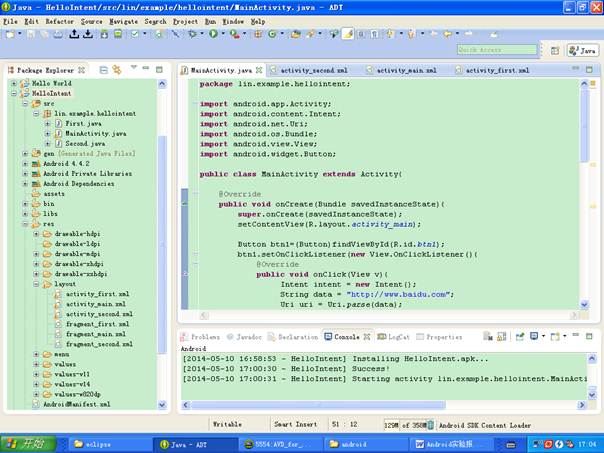
(3.1)MainActivity.java
package lin.example.hellointent;
import android.app.Activity;
import android.content.Intent;
import android.net.Uri;
import android.os.Bundle;
import android.view.View;
import android.widget.Button;
publicclass MainActivity extends Activity{
@Override
publicvoid onCreate(Bundle savedInstanceState){
super.onCreate(savedInstanceState);
setContentView(R.layout.activity_main);
Button btn1=(Button)findViewById(R.id.btn1);
btn1.setOnClickListener(new View.OnClickListener(){
@Override
publicvoid onClick(View v){
Intent intent = new Intent();
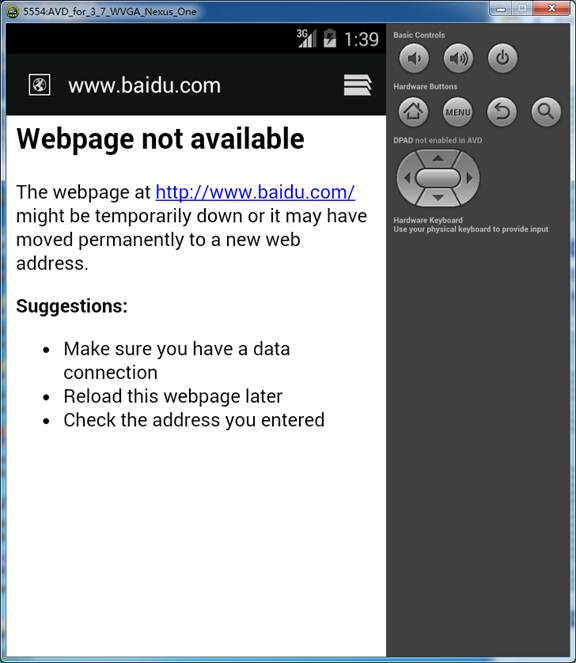
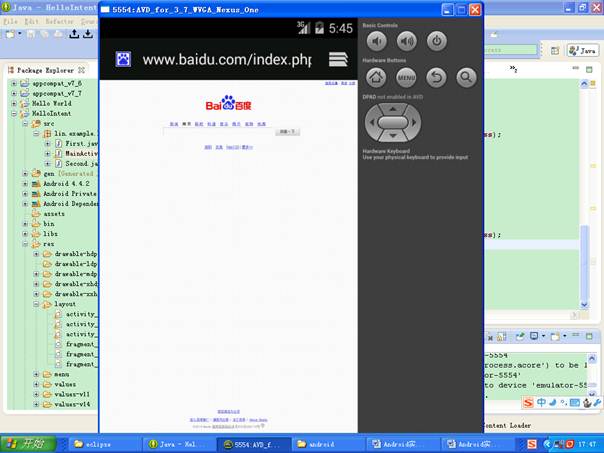
String data = "http://www.baidu.com";
Uri uri = Uri.parse(data);
intent.setAction(intent.ACTION_VIEW);
intent.setData(uri);
startActivity(intent);
}
});
Button btn2 = (Button)findViewById(R.id.btn2);
btn2.setOnClickListener(new View.OnClickListener(){
@Override
publicvoid onClick(View v){
Intent intent = new Intent();
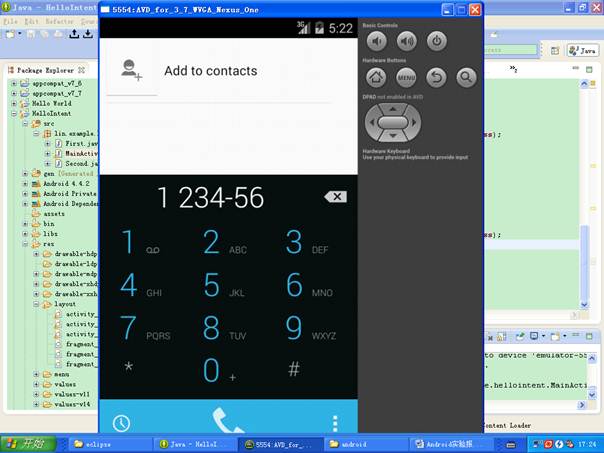
String data = "tel:123456";
Uri uri = Uri.parse(data);
intent.setAction(intent.ACTION_DIAL);
intent.setData(uri);
startActivity(intent);
}
});
Button btn3 = (Button)findViewById(R.id.btn3);
btn3.setOnClickListener(new View.OnClickListener(){
@Override
publicvoid onClick(View v){
Intent intent = new Intent();
intent.setClass(MainActivity.this, First.class);
startActivity(intent);
}
});
Button btn4 = (Button)findViewById(R.id.btn4);
btn4.setOnClickListener(new View.OnClickListener(){
@Override
publicvoid onClick(View v){
Intent intent = new Intent();
intent.setClass(MainActivity.this,Second.class);
startActivity(intent);
}
});
}
}
(3.2)First.java
package lin.example.hellointent;
import android.app.Activity;
import android.os.Bundle;
publicclass First extends Activity {
@Override
protectedvoid onCreate(Bundle savedInstanceState) {
super.onCreate(savedInstanceState);
setContentView(R.layout.activity_first);
}
}
(3.3)Second.java
package lin.example.hellointent;
import android.app.Activity;
import android.os.Bundle;
publicclass Second extends Activity {
@Override
protectedvoid onCreate(Bundle savedInstanceState) {
super.onCreate(savedInstanceState);
setContentView(R.layout.activity_second);
}
}
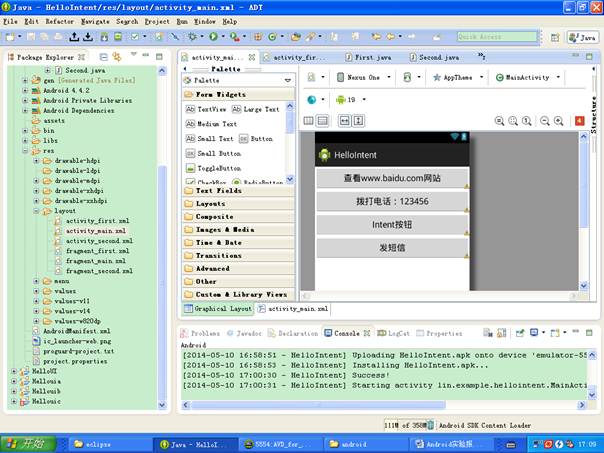
(4)layout代码
(4.1)activity_main.xml
<LinearLayout xmlns:android="http://schemas.android.com/apk/res/android"
xmlns:tools="http://schemas.android.com/tools"
android:id="@+id/container"
android:layout_width="fill_parent"
android:layout_height="fill_parent"
android:orientation="vertical"
tools:context="lin.example.hellointent.MainActivity"
tools:ignore="MergeRootFrame" >
<Button
android:id="@+id/btn1"
android:layout_width="fill_parent"
android:layout_height="wrap_content"
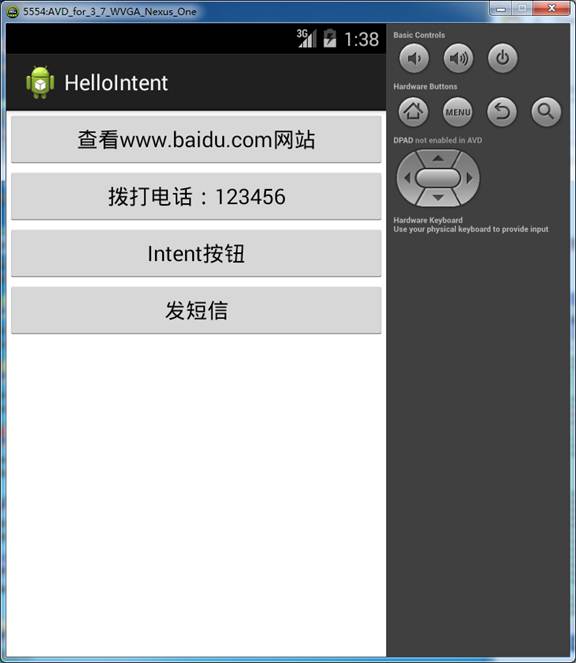
android:text="查看www.baidu.com网站" />
<Button
android:id="@+id/btn2"
android:layout_width="fill_parent"
android:layout_height="wrap_content"
android:text="拨打电话:123456" />
<Button
android:id="@+id/btn3"
android:layout_width="fill_parent"
android:layout_height="wrap_content"
android:text="Intent按钮" />
<Button
android:id="@+id/btn4"
android:layout_width="fill_parent"
android:layout_height="wrap_content"
android:text="发短信" />
</LinearLayout>
(4.2)activity_first.xml
<FrameLayout xmlns:android="http://schemas.android.com/apk/res/android"
xmlns:tools="http://schemas.android.com/tools"
android:id="@+id/container"
android:layout_width="fill_parent"
android:layout_height="fill_parent"
tools:context="lin.example.hellointent.First"
tools:ignore="MergeRootFrame" >
<TextView
android:id="@+id/textView1"
android:layout_width="fill_parent"
android:layout_height="match_parent"
android:text="上海电机学院" />
</FrameLayout>
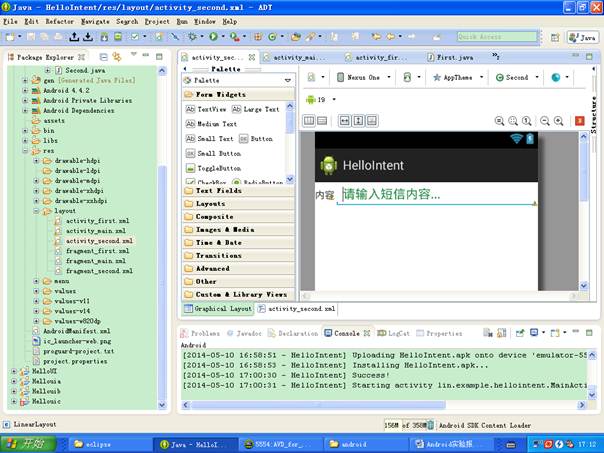
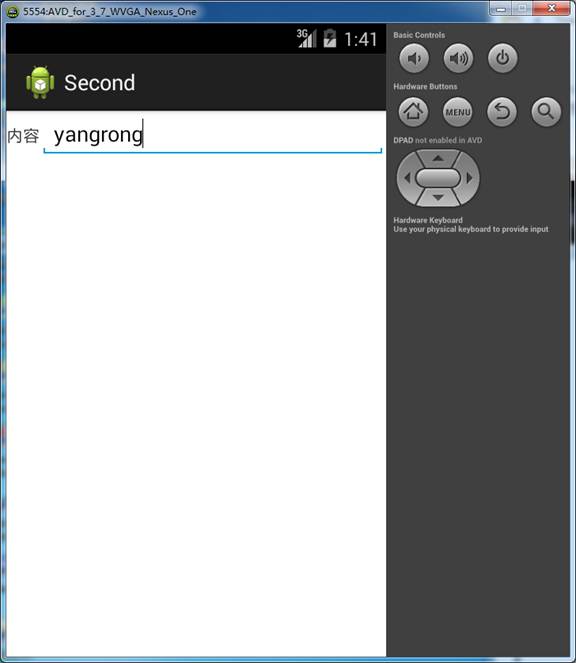
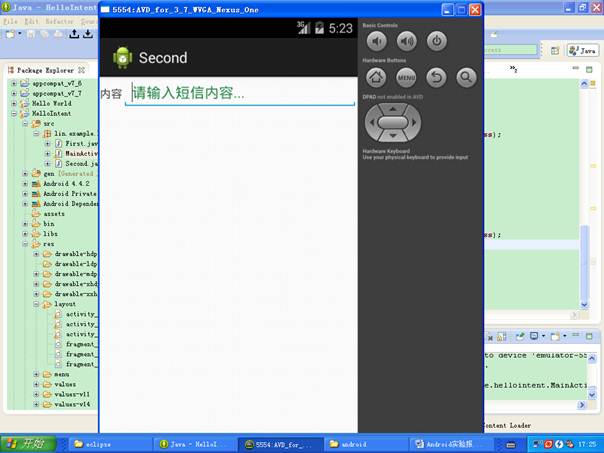
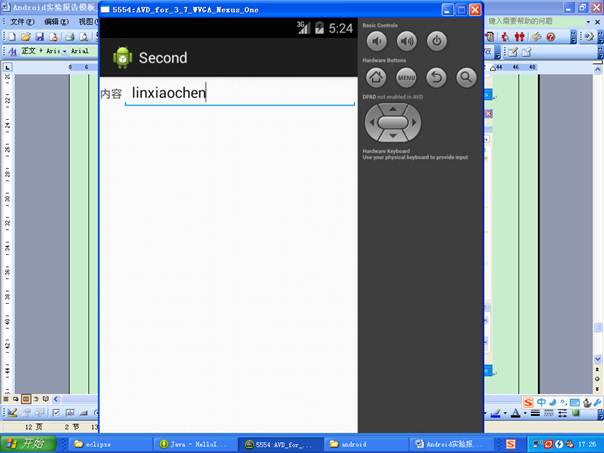
(4.3)activity_second.xml
<LinearLayout xmlns:android="http://schemas.android.com/apk/res/android"
xmlns:tools="http://schemas.android.com/tools"
android:id="@+id/container"
android:layout_width="fill_parent"
android:layout_height="fill_parent"
tools:context="lin.example.hellointent.Second"
tools:ignore="MergeRootFrame" >
<TextView
android:id="@+id/textView1"
android:layout_width="wrap_content"
android:layout_height="wrap_content"
android:text="内容" />
<EditText
android:id="@+id/editText1"
android:layout_width="wrap_content"
android:layout_height="wrap_content"
android:layout_weight="1"
android:hint="请输入短信内容..."
android:textColorHint="#238745">
<requestFocus />
</EditText>
</LinearLayout>
5 运行
Console: Android
[20##-05-10 16:55:03 - HelloIntent] ------------------------------
[20##-05-10 16:55:03 - HelloIntent] Android Launch!
[20##-05-10 16:55:03 - HelloIntent] adb is running normally.
[20##-05-10 16:55:03 - HelloIntent] Performing lin.example.hellointent.MainActivity activity launch
[20##-05-10 16:55:04 - HelloIntent] Automatic Target Mode: launching new emulator with compatible AVD 'AVD_for_3_7_WVGA_Nexus_One'
[20##-05-10 16:55:04 - HelloIntent] Launching a new emulator with Virtual Device 'AVD_for_3_7_WVGA_Nexus_One'
[20##-05-10 16:56:11 - HelloIntent] New emulator found: emulator-5554
[20##-05-10 16:56:11 - HelloIntent] Waiting for HOME ('android.process.acore') to be launched...
[20##-05-10 16:58:51 - HelloIntent] HOME is up on device 'emulator-5554'
[20##-05-10 16:58:51 - HelloIntent] Uploading HelloIntent.apk onto device 'emulator-5554'
[20##-05-10 16:58:53 - HelloIntent] Installing HelloIntent.apk...
[20##-05-10 17:00:30 - HelloIntent] Success!
[20##-05-10 17:00:31 - HelloIntent] Starting activity lin.example.hellointent.MainActivity on device emulator-5554
6、测试数据与实验结果


5、结果分析与实验体会
第二篇:android实验报告模板(新)

移动互联网开发(Android)
实验报告
姓名: 万 思
学号: k081241139
专业: 计算机科学与技术
指导老师: 张华
完成日期: 20##-11-16
目 录
实验一 Android开发环境的搭建.................................................................................... 4
1 实验目的及要求.................................................................................................... 4
2 实验设备(环境)及要求...................................................................................... 4
3 实验内容............................................................................................................... 4
4 实验步骤............................................................................................................... 4
5 实验核心代码(关键代码),及调试中的问题....................................................... 4
6 实验的运行结果及分析.......................................................................................... 4
7 实验总结心得体会................................................................................................. 4
实验二 GUI创建套件Widget的使用.............................................................................. 4
1 实验目的及要求.................................................................................................... 4
2 实验设备(环境)及要求...................................................................................... 4
3 实验内容............................................................................................................... 4
4 实验步骤............................................................................................................... 4
5 实验核心代码(关键代码),及调试中的问题....................................................... 4
6 实验的运行结果及分析.......................................................................................... 4
7 实验总结心得体会................................................................................................. 5
实验三 SQLite应用......................................................................................................... 5
1 实验目的及要求.................................................................................................... 5
2 实验设备(环境)及要求...................................................................................... 5
3 实验内容............................................................................................................... 5
4 实验步骤............................................................................................................... 5
5 实验核心代码(关键代码),及调试中的问题....................................................... 5
6 实验的运行结果及分析.......................................................................................... 5
7 实验总结心得体会................................................................................................. 5
实验四 获取手机剩余电量............................................................................................... 5
1 实验目的及要求.................................................................................................... 5
2 实验设备(环境)及要求...................................................................................... 5
3 实验内容............................................................................................................... 5
4 实验步骤............................................................................................................... 5
5 实验核心代码(关键代码),及调试中的问题....................................................... 5
6 实验的运行结果及分析.......................................................................................... 6
7 实验总结心得体会................................................................................................. 6
实验五 网络访问与服务................................................................................................... 6
1 实验目的及要求.................................................................................................... 6
2 实验设备(环境)及要求...................................................................................... 6
3 实验内容............................................................................................................... 6
4 实验步骤............................................................................................................... 6
5 实验核心代码(关键代码),及调试中的问题....................................................... 6
6 实验的运行结果及分析.......................................................................................... 6
7 实验总结心得体会................................................................................................. 6
实验六 Service的使用.................................................................................................... 6
1 实验目的及要求.................................................................................................... 6
2 实验设备(环境)及要求...................................................................................... 6
3 实验内容............................................................................................................... 6
4 实验步骤............................................................................................................... 6
5 实验核心代码(关键代码),及调试中的问题....................................................... 7
6 实验的运行结果及分析.......................................................................................... 7
7 实验总结心得体会................................................................................................. 7
实验一 Android开发环境的搭建
1 实验目的及要求
1.搭建Eclipse+Android开发平台
2.创建简单的Android应用程序
3.创建Activity并利用intent的实现Activity的跳转
2 实验设备(环境)及要求
1) PC计算机
2) JDK安装包
3) Eclipse安装包
4) Android SDK安装包
5) ADT插件
3 实验内容
1)搭建EClipse+Android开发环境
2)创建一个简单的”hello world”工程
3)创建两个Activity,实现简单的Activity之间的参数传递
4 实验步骤
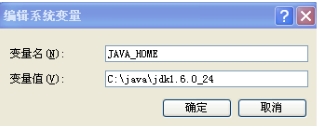
1)下载安装JDK 1.6,配置环境变量,如果所示。
5 实验核心代码(关键代码),及调试中的问题
1.MainActivity.java
package com.example.app;
import android.os.Bundle;
import android.app.Activity;
import android.content.Intent;
import android.view.Menu;
import android.view.View;
import android.widget.Button;
public class MainActivity extends Activity {
private Button button;
private myapp ma;
@Override
protected void onCreate(Bundle savedInstanceState) {
super.onCreate(savedInstanceState);
setContentView(R.layout.activity_main);
button=(Button)this.findViewById(R.id.button);
button.setOnClickListener(new View.OnClickListener() {
@Override
public void onClick(View v) {
// TODO 自动生成的方法存根
ma=(myapp)getApplication();
ma.setName("张处处");
Intent intent=new Intent(MainActivity.this,other.class);
startActivity(intent);
}
});
}
@Override
public boolean onCreateOptionsMenu(Menu menu) {
// Inflate the menu; this adds items to the action bar if it is present.
getMenuInflater().inflate(R.menu.main, menu);
return true;
}
}
2.myapp.java
package com.example.app;
import android.app.Application;
import android.os.Bundle;
public class myapp extends Application {
private String name;
public String getName() {
return name;
}
public void setName(String name) {
this.name = name;
}
@Override
public void onCreate() {
// TODO 自动生成的方法存根
super.onCreate();
setName("张三丰");
}
}
other.java
public class other extends Activity {
private TextView textview;
private myapp ma;
@Override
protected void onCreate(Bundle savedInstanceState) {
// TODO 自动生成的方法存根
super.onCreate(savedInstanceState);
textview=(TextView)this.findViewById(R.id.text);
ma=(myapp)getApplication();
textview.setText("---->appname"+ma.getName());
}
}
6 实验的运行结果及分析


7 实验总结心得体会
掌握了搭建Android开发环境的方法,掌握了Android模拟器的基本操作,如设置选择语言,切换外观和横屏显示。能独立的搭建Android的开发环境,并且测试新的项目成功
实验二 GUI创建套件Widget的使用
1 实验目的及要求
1.掌握资源编辑器、布局编辑器的使用
2.掌握按钮、编辑框、日期时间、对话框、下拉列表等主要widget组件编程
3.
2 实验设备(环境)及要求
3 实验内容
4 实验步骤
5 实验核心代码(关键代码),及调试中的问题
6 实验的运行结果及分析
7 实验总结心得体会
实验三 SQLite应用
1 实验目的及要求
2 实验设备(环境)及要求
3 实验内容
4 实验步骤
5 实验核心代码(关键代码),及调试中的问题
6 实验的运行结果及分析
7 实验总结心得体会
实验四 获取手机剩余电量
1 实验目的及要求
2 实验设备(环境)及要求
3 实验内容
4 实验步骤
5 实验核心代码(关键代码),及调试中的问题
6 实验的运行结果及分析
7 实验总结心得体会
实验五 网络访问与服务
1 实验目的及要求
2 实验设备(环境)及要求
3 实验内容
4 实验步骤
5 实验核心代码(关键代码),及调试中的问题
6 实验的运行结果及分析
7 实验总结心得体会
实验六 Service的使用
1 实验目的及要求
2 实验设备(环境)及要求
3 实验内容
4 实验步骤
5 实验核心代码(关键代码),及调试中的问题
6 实验的运行结果及分析
7 实验总结心得体会
-
android本科实验报告
本科实验报告课程名称实验项目实验地点专业班级学生姓名指导教师Android设计与开发Android课程实验学号年月日太原理工大学学…
-
Android实训实验报告
报告编号第5组综合课程设计报告基于Android平台的记事本的设计与实现学生姓名指导教师所在系电子工程系所学专业计算机科学与技术班…
-
Android实验报告
实验报告课程名称手机应用开发实验名称Android实验院系信息与控制工程学院专业班级姓名学号指导教师20xx年月日实验一一实验名称…
-
Android编程基础 实验报告三
南昌航空大学实验报告二0一三年一月六日课程名称移动终端编程技术实验名称Android组件通信和后台服务班级姓名同组人指导教师评定签…
- Android实验报告模板_实验四
-
Android实训实验报告
报告编号第5组综合课程设计报告基于Android平台的记事本的设计与实现学生姓名指导教师所在系电子工程系所学专业计算机科学与技术班…
-
Android实验报告
实验报告课程名称手机应用开发实验名称Android实验院系信息与控制工程学院专业班级姓名学号指导教师20xx年月日实验一一实验名称…
-
android实验报告模板(新)
移动互联网开发Android实验报告姓名万思学号专业指导老师张华完成日期20xx1116目录实验一Android开发环境的搭建41…
-
Android实验报告—网络通信
实验三Android网络通信实验目的本实验的目的是使学生深入了解利用Intent实现进程间的通信过程学会利用Intent进行Act…
-
Android实验一实验报告
姓名丁军峰Android实验报告一班级信科123学号08123448一实验内容编写一个Android应用程序实现对自己物品的管理功…
- Android上机实验报告