android 学习总结
第六周总结
2011.10.31—2011.11.4
1. Android学习3—Android当中的常见控件
Android当中的常见控件为:TextView、EditText、Button、Menu。
(1)在Activity03当中,要声明四个控件 在main.xml声明。
(2)要为其中的两个控件设置显示的值
(3)创建一个监听器类,监听按钮按下的动作
(4)将监听器类的对象,绑定在按钮对象上
1)在main.xml中声明四个控件
<EditText
android:id="@+id/factorOne"
android:layout_width="fill_parent"
android:layout_height="vrap_content"
/>
<EditText
android:id="@+id/symbol" //除号
android:layout_width="fill_parent"
android:layout_height="vrap_content"
android:text="@string/hello"
/>
<EditText
android:id="@+id/factorTwo"
android:layout_width="fill_parent"
android:layout_height="vrap_content"
/>
<Button
android:id="@+id/calculate"
android:layout_width="fill_parent"
android:layout_height="vrap_content"
/>
2)然后要在Activity中把四个控件取出来,首先定义一下四个控件。
private EditText factorOne ;
private EditText factorTwo;
private TextView symbol;
private Button calculate;
3)用findViewById这个方法 把四个控件对象都取出来
factorOne = (EditText)findViewById(R.id.factorOne);
factorTwo = (EditText)findViewById(R.id.factorTwo);
symbol = (TextView)findViewById(R.id.symbol);
calculate = (Button)findViewById(R.id.calculate);
4)为symbol和calculate设置显示的值
// symbol.setText("乘以");
// calculate.setText("计算"); 为了以后修改程序方便,一般不在这里设置显示的值,而在String.xml中设置
symbol.setText(R.string.symbol);
calculate.setText(R.string.calculate);
5)编写监听器
(1)取得factorOne 和factorTwo 的值。
(2)把取得的值放到Intent键值对当中。
(3)用Intent启动ResultActivity。
class CalculateListener implements OnClickListener{
@Override
public void onClick(View v) {
//取得两个EditText控件的值
String factorOneStr = factorOne.getText().toString();
String factorTwoStr = factorTwo.getText().toString();
//将这两个值存放到Intent对象当中
Intent intent = new Intent();
intent.putExtra("one",factorOneStr);
intent.putExtra("two",factorTwoStr);
intent.setClass(Activity03.this, ResultActivity.class);
//使用这个Intent对象来启动ResultActivity
Activity03.this.startActivity(intent);
6)绑定!
将监听器的对象绑定到按钮对象上面
calculate.setOnClickListener(new CalculateListener());
7)编写ResultActivity
//1.接受从Activity03当中所传递的值(键值对)
//2.计算两个值的积
//3.将计算的结果显示在Activity上
8)在result.xml加TextView
<EditText
android:id="@+id/result"
android:layout_width="fill_parent"
android:layout_height="vrap_content"
/>
9)同样,先声明TextView对象,也就是把TextView取出来
private TextView resultView;
10)用findViewByID这个方法把控件对象取出来
resultView = (TextView)findViewById(R.id.result);
11)得到Intent对象当中的值
Intent intent = getIntent();
String factorOneStr = intent.getStringExtra("one");
String factorTwoStr = intent.getStringExtra("two");
int factorOneInt = Integer.parseInt(factorOneStr); //字符串转整形
int factorTwoInt = Integer.parseInt(factorTwoStr); //字符串转整形
12)计算两个值的积
int result = factorOneInt * factorTwoInt;
13)显示结果
resultView.setText(result + ""); //result是整形结果,要转化成字符串。JAVA规定,加号两端有 一端为字符串(""为空字符串),另外一端result也会转化为字符串,结果为字符串。
14)总体完成。再添加Menu控件,当点击手机Menu按钮的时候执行函数。
复写方法:onCreateOptionsMenu //复写函数:右键——source——Override/Implement Methods
public boolean onCreateOptionsMenu(Menu menu) {
menu.add(0, 1, 1, R.string.exit); // 参数 (菜单所处组的名字 ID,当前菜单的ID ItemId,排序,按钮显示的内容)显示内容要写在strings.xml当中
menu.add(0,2,2,R.string.about);
return super.onCreateOptionsMenu(menu);
}
复写onOptionsItemSelected //当客户点击菜单当中的某一个选项时,会调用该方法
public boolean onOptionsItemSelected(MenuItem item) {
if(item.getItemId() == 1){
finish();
}
return super.onOptionsItemSelected(item);
}
程序清单如下。
Activity_03Activity
package joes.activity;
import android.app.Activity;
import android.content.Intent;
import android.os.Bundle;
import android.view.Menu;
import android.view.MenuItem;
import android.view.View;
import android.view.View.OnClickListener;
import android.widget.Button;
import android.widget.EditText;
import android.widget.TextView;
//1.首先声明四个控件
//2.为其中两个控件设置显示的值
//3.创建一个监听器类,监听按钮按下的动作
//4.将监听器的对象绑定在按钮对象上
publicclass Activity_03Activity extends Activity {
private EditText factorOne;
private EditText factorTwo;
private TextView symbol;
private Button calculator;
/** Called when the activity is first created. */
@Override
publicvoid onCreate(Bundle savedInstanceState) {
super.onCreate(savedInstanceState);
setContentView(R.layout.main);
//根据控件的id来取得代表控件的对象
factorOne = (EditText)findViewById(R.id.factorOne);
factorTwo = (EditText)findViewById(R.id.factorTwo);
symbol = (TextView)findViewById(R.id.symbol);
calculator = (Button)findViewById(R.id.calculator);
//为symbol和calculator设置显示的值
// symbol.setText("乘以");
//symbol.setText("计算"); 在String中设置显示的值便于以后修改
symbol.setText(R.string.symbol);
calculator.setText(R.string.calculator);
calculator.setOnClickListener(new CalculatorListener());//将监听器绑定到按钮对象上面
}
//添加回调函数 ,当客户点击menu按钮时调用该方法
@Override
publicboolean onCreateOptionsMenu(Menu menu) {
// TODO Auto-generated method stub
menu.add(0,1,1,R.string.exit);//向菜单中添加了两个选项
menu.add(0,2,2,R.string.about);
returnsuper.onCreateOptionsMenu(menu);
}
//为menu添加动作,也是一个回调函数,当客户点击菜单当中的某一个选项时调用该方法
@Override
publicboolean onOptionsItemSelected(MenuItem item) {
if(item.getItemId() == 1){
finish();//调用finish方法
}
returnsuper.onOptionsItemSelected(item);
}
class CalculatorListener implements OnClickListener{//编写一个监听器
@Override
publicvoid onClick(View v) {
// TODO Auto-generated method stub
//1.取得两个EditText的值
String factorOneStr = factorOne.getText().toString();
String factorTwoStr = factorTwo.getText().toString();
//2.将这两个值存放到Intent对象当中
Intent intent = new Intent();
intent.putExtra("one", factorOneStr);
intent.putExtra("two", factorTwoStr);
intent.setClass(Activity_03Activity.this, ResultActivity.class);
//3.使用这个Intent对象来启动ResultActivity
Activity_03Activity.this.startActivity(intent);
}
}
ResultActivity
package joes.activity;
import android.app.Activity;
import android.content.Intent;
import android.os.Bundle;
import android.widget.TextView;
//1.接受从Activity03当中所传递的值
//2.计算这两个值得乘积
//3.将计算结果显示在Activity上面
publicclass ResultActivity extends Activity{
private TextView resultView;
@Override
protectedvoid onCreate(Bundle savedInstanceState) {
// TODO Auto-generated method stub
super.onCreate(savedInstanceState);
setContentView(R.layout.result);
resultView = (TextView)findViewById(R.id.result);
//得到intent对象当中的值
Intent intent = getIntent();
String factorOneStr = intent.getStringExtra("one");
String factorTwoStr = intent.getStringExtra("two");
//将字符串转换成整型以便于乘积的运算
int factorOneInt = Integer.parseInt(factorOneStr);
int factorTwoInt = Integer.parseInt(factorTwoStr);
//计算两个整型的值
int result = factorOneInt * factorTwoInt;
//将乘积显示出来
resultView.setText(result + ""); //因为setText显示的字符串,而result是整型,所以加上一个空字符串,java语法规定,+号两端有一个是字符串,那么两一个也是字符串
}
}
AndroidManifest.xml
<?xml version="1.0" encoding="utf-8"?>
<manifest xmlns:android="http://schemas.android.com/apk/res/android"
package="joes.activity"
android:versionCode="1"
android:versionName="1.0">
<uses-sdk android:minSdkVersion="4" />
<application android:icon="@drawable/icon" android:label="@string/app_name">
<activity android:name=".Activity_03Activity"
android:label="@string/app_name">
<intent-filter>
<action android:name="android.intent.action.MAIN" />
<category android:name="android.intent.category.LAUNCHER" />
</intent-filter>
</activity>
<activity android:name=".ResultActivity" android:label="@string/resultLabel"/>
</application>
</manifest>
main.xml
<?xml version="1.0" encoding="utf-8"?>
<LinearLayout xmlns:android="http://schemas.android.com/apk/res/android"
android:orientation="vertical"
android:layout_width="fill_parent"
android:layout_height="fill_parent"
>
<EditText
android:id="@+id/factorOne"
android:layout_width="fill_parent"
android:layout_height="wrap_content"
/>
<TextView
android:id="@+id/symbol"
android:layout_width="fill_parent"
android:layout_height="wrap_content"
android:text="@string/hello"
/>
<EditText
android:id="@+id/factorTwo"
android:layout_width="fill_parent"
android:layout_height="wrap_content"
/>
<Button
android:id="@+id/calculator"
android:layout_width="fill_parent"
android:layout_height="wrap_content"
/>
</LinearLayout>
result.xml
<?xml version="1.0" encoding="utf-8"?>
<LinearLayout xmlns:android="http://schemas.android.com/apk/res/android"
android:orientation="vertical"
android:layout_width="fill_parent"
android:layout_height="fill_parent"
>
<TextView
android:id="@+id/result"
android:layout_width="fill_parent"
android:layout_height="wrap_content"
/>
</LinearLayout>
strings.xml
<?xml version="1.0" encoding="utf-8"?>
<resources>
<string name="hello">Hello World, Activity_03Activity!</string>
<string name="app_name">Activity_03</string>
<string name="resultLabel">result</string>
<string name="symbol">乘以</string>
<string name="calculator">计算</string>
<string name="exit">退出</string>
<string name="about">关于</string>
</resources>
2. Android学习4—Activity生命周期
Activity生命周期:
一个activity主要有三个状态:
当在屏幕前台时(位于当前任务堆栈的顶部),它是活跃或运行的状态。它就是相应用户操作的activity。
当它失去焦点但仍然对用户可见时,它处于暂停状态。即是:在它之上有另外一个activity。这个activity也许是透明的,或者未能完全遮蔽全屏,所以被暂停的activity仍对用户可见。暂停的activity仍然是存活状态(它保留着所有的状态和成员信息并连接至窗口管理器),但当系统处于极低内存的情况下,仍然可以杀死这个activity。
如果它完全被另一个activity覆盖,它处于停止状态。它仍然保留所有的状态和成员信息。然而它不再为用户可见,所以它的窗口将被隐藏,如果其他地方需要内存,则系统经常会杀死这个activity。
如果一个activity处于暂停或停止状态,系统可以通过要求它结束(调用它的 finish() 方法)或直接杀死它的进程来将它驱出内存。当它再次为用户可见的时候,它只能完全重新启动并恢复至以前的状态。
当一个activity从这个状态转变到另一个状态时,它被下列protected方法所通知:
void onCreate(Bundle savedInstanceState)
void onStart()
void onRestart()
void onResume()
void onPause()
void onStop()
void onDestroy()
可以重载所有这些方法以在状态改变时进行合适的工作。所有的activity都必须实现 onCreate() 用以当对象第一次实例化时进行初始化设置。很多情况下在activity中实现 onPause()以提交数据变化或准备停止与用户的交互。
调用父类。所有activity生命周期方法的实现都必须先调用其父类的版本。比如说:
protected void onPause() {
super.onPause();
. . .
}
总的来说,这七个方法定义了一个activity完整的生命周期。实现这些方法可以帮助我们监察三个嵌套的生命周期循环。
(1)一个activity 完整的生命周期自第一次调用 onCreate()开始,直至调用onDestroy()为止。activity在onCreate()中设置所有“全局”状态以完成初始化,而在onDestroy()中释放所有系统资源。比如说,如果activity有一个线程在后台运行以从网络上下载数据,它会以 onCreate()创建那个线程,而以 onDestroy()销毁那个线程。
(2) 一个activity的可视生命周期自 onStart() 调用开始直到相应的 onStop()调用。在此期间,用户可以在屏幕上看到此activity,尽管它也许并不是位于前台或者正在与用户做交互。在这两个方法中,你可以管控用来向用户显示这个activity的资源。比如说,你可以在onStart() 中注册一个BroadcastReceiver 来监控会影响到你UI的改变,而在onStop() 中来取消注册,这时用户是无法看到你的程序显示的内容的。onStart() 和 onStop() 方法可以随着应用程序是否为用户可见而被多次调用。
(3)一个activity的 前台生命周期自 onResume() 调用起,至相应的 onPause()调用为止。在此期间,activity位于前台最上面并与用户进行交互。activity会经常在暂停和恢复之间进行状态转换──比如说当设备转入休眠状态或有新的activity启动时,将调用onPause() 方法。当activity获得结果或者接收到新的intent的时候会调用onResume() 方法。因此,在这两个方法中的代码应当是轻量级的。
下表详细描述了这些方法,并在activity的整个生命周期中定位了它们。

注意上表中可被杀死一列,它标示了在方法返回后,还没执行activity的其余代码的任意时间里,系统是否可以杀死包含此activity的进程。三个方法(onPause()、 onStop()和onDestroy())被标记为“是”。onPause()是三个中的第一个,它也是唯一一个在进程被杀死之前必然会调用的方法──onStop() 和 onDestroy() 有可能不被执行。因此你应该用 onPause() 来将所有持久性数据(比如用户的编辑结果)写入存储之中。
在可被杀死一列中标记为“否”的方法在它们被调用时将保护activity所在的进程不会被杀死。所以只有在onPause()方法返回后到onResume() 方法被调用时,一个activity才处于可被杀死的状态。在onPause()再次被调用并返回之前,它不会被系统杀死。
如后面一节进程和生命周期所述,即使是在这里技术上没有被定义为“可杀死”的activity仍然有可能被系统杀死──但这仅会发生在实在没有其它方法的极端情况之下。
保存activity状态
当系统而不是用户自己出于回收内存的考虑,关闭了一个activity之后。用户会期望当他再次回到那个activity的时候,它仍保持着上次离开时的样子。
为了获取activity被杀死前的状态,应该为activity实现onSaveInstanceState() 方法。Android会调用此方法在activity有可能被销毁之前(即onPause() 调用之前)。它会将一个以名称-值对方式记录了activity动态状态的Bundle 对象传递给该方法。当activity再次启动时,这个Bundle会传递给onCreate()方法和随着onStart()方法调用的onRestoreInstanceState(),所以它们两个都可以恢复捕获的状态。
与onPause()或先前讨论的其他方法不同,onSaveInstanceState() 和 onRestoreInstanceState() 并不是生命周期方法。它们并不是总会被调用。比如说,Android会在activity易于被系统销毁之前调用 onSaveInstanceState(),但用户动作(比如按下了BACK键)造成的销毁则不调用。在这种情况下,用户没打算再次回到这个activity,所以没有保存状态的必要。
因为onSaveInstanceState()不是总被调用,所以你应该只用它来为activity保存一些临时的状态,而不能用来保存持久性数据。而是应该用onPause()来达到这个目的。
协调activity
当一个activity启动了另外一个的时候,它们都会经历生命周期变化。一个会暂停乃至停止,而另一个则启动。这种情况下,可能需要协调好这些activity。
生命周期回调顺序是已经定义好的,尤其是在两个activity在同一个进程内的情况下。
(1) 调用当前activity的 onPause() 方法。
(2) 接着,顺序调用新启动activity的onCreate()、 onStart()和onResume()方法。
(3) 然后,如果启动的activity不再于屏幕上可见,则调用它的onStop()方法。
总结如下:
(1)Activity 从创建到进入运行态所触发的事件:onCreate()-->onStart-->onResume()
(2)从运行态到停止态所触发的事件:onPause()--->onStop()
(3)从停止态到运行态所触发事件: onRestart()-->onStart()--->onResume()
(4)从运行态到暂停态所触发事件:onPause()
( 5)从暂停态到运行态所触发事件:onResume()
3. Android学习5—Activity布局初步(一)
(1)LinearLayout(线性布局)就是把控件一个挨一个顺序排下来。下面是一个简单线性布局例子。
Layout_01.java
package joes.layout01;
import android.app.Activity;
import android.os.Bundle;
publicclass Layout_01Activity extends Activity {
/** Called when the activity is first created. */
@Override
publicvoid onCreate(Bundle savedInstanceState) {
super.onCreate(savedInstanceState);
setContentView(R.layout.main);
}
}
main.xml
<?xml version="1.0" encoding="utf-8"?>
<LinearLayout xmlns:android="http://schemas.android.com/apk/res/android"
android:orientation="horizontal"
android:layout_width="fill_parent"
android:layout_height="fill_parent"
>
<!--
android:id —— 为控件指定相应的ID
android:text —— 指定控件当中显示的文字,需要注意的是,这里尽量使用Strings.xml文件当中的字符串
android:gravity —— 指定控件的基本位置,比如说居中,居右等位置
android:textSize —— 指定控件当中字体的大小
android:background —— 指定该控件所使用的背景色,RGB命名法
android:width —— 指定控件的宽度
android:height —— 指定控件的高度
android:padding* —— 指定控件的内边距,也就是说控件当中的内容距离内边框的距离
android:singleLine —— 如果设置为真的话,则将控件的内容在同一行当中进行显示
-->
<TextView
android:id="@+id/firstText"
android:text="第一行"
android:gravity="center_vertical"
android:textSize="15pt"
android:background="#00aa00"
android:layout_width="fill_parent"
android:layout_height="wrap_content"
android:paddingLeft="10dip"
android:paddingTop="20dip"
android:paddingRight="30dip"
android:paddingBottom="40dip"
android:layout_weight="1"
android:singleLine="true"/>
<TextView
android:id="@+id/secondText"
android:text="第二行"
android:gravity="center_vertical"
android:textSize="15pt"
android:background="#0000aa"
android:layout_width="fill_parent"
android:layout_height="wrap_content"
android:layout_weight="1"/>
/>
</LinearLayout>
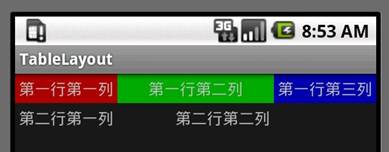
(2)TableLayout(表格布局)使用一种表格的方式进行布局和管理
下面是一个简单表格布局的例子。
Layout_02.java
package joes.layout02;
import android.app.Activity;
import android.os.Bundle;
publicclass TableLayout extends Activity {
/** Called when the activity is first created. */
@Override
publicvoid onCreate(Bundle savedInstanceState) {
super.onCreate(savedInstanceState);
setContentView(R.layout.main);
}
}
main.xml
<?xml version="1.0" encoding="utf-8"?>
<TableLayout xmlns:android="http://schemas.android.com/apk/res/android"
android:layout_width="fill_parent"
android:layout_height="fill_parent"
android:stretchColumns="1">
<!--
android:stretchColumns=“1” 将指定的列拉伸以填满整个控件,这里是将第一列拉伸,注意java语言是从第0列开始计的
-->
<TableRow>
<TextView
android:text="@string/row1_column1"
android:background="#aa0000"
android:padding="3dip" />
<TextView
android:text="@string/row1_column2"
android:background="#00aa00"
android:gravity="center_horizontal"
android:padding="3dip"/>
<TextView
android:text="@string/row1_column3"
android:background="#0000aa"
android:gravity="right"
android:padding="3dip"/>
</TableRow>
<TableRow>
<TextView
android:text="@string/row2_column1"
android:padding="3dip"/>
<TextView
android:text="@string/row2_column2"
android:gravity="right"
android:padding="3dip"/>
</TableRow>
</TableLayout>
strings.xml
?xml version="1.0" encoding="utf-8"?>
<resources>
<string name="hello">Hello World, TableLayout!</string>
<string name="app_name">TableLayout</string>
<string name="row1_column1">第一行第一列</string>
<string name="row1_column2">第一行第二列</string>
<string name="row1_column3">第一行第三列</string>
<string name="row2_column1">第二行第一列</string>
<string name="row2_column2">第二行第二列</string>
</resources>
4. Android学习6—Activity布局初步(二)
主要学习嵌套布局,即在多个线性布局和表格之间混合布局。
例程一:线性布局套线性布局
Layout04.java
package joes.layout04;
import android.app.Activity;
import android.os.Bundle;
publicclass Layout04 extends Activity {
/** Called when the activity is first created. */
@Override
publicvoid onCreate(Bundle savedInstanceState) {
super.onCreate(savedInstanceState);
setContentView(R.layout.main);
}
}
main.xml
<?xml version="1.0" encoding="utf-8"?>
<LinearLayout xmlns:android="http://schemas.android.com/apk/res/android"
android:orientation="vertical"
android:layout_width="wrap_content"
android:layout_height="wrap_content"
>
<LinearLayout
android:orientation="horizontal"
android:layout_width="wrap_content"
android:layout_height="wrap_content"
android:layout_weight="1">
<TextView
android:text="red"
android:gravity="center_horizontal"
android:background="#aa0000"
android:layout_width="wrap_content"
android:layout_height="fill_parent"
android:layout_weight="1"/>
<TextView
android:text="green"
android:gravity="center_horizontal"
android:background="#00aa00"
android:layout_width="wrap_content"
android:layout_height="fill_parent"
android:layout_weight="1"/>
<TextView
android:text="blue"
android:gravity="center_horizontal"
android:background="#0000aa"
android:layout_width="wrap_content"
android:layout_height="fill_parent"
android:layout_weight="1"/>
<TextView
android:text="yellow"
android:gravity="center_horizontal"
android:background="#aaaa00"
android:layout_width="wrap_content"
android:layout_height="fill_parent"
android:layout_weight="1"/>
></LinearLayout>
<LinearLayout
android:orientation="vertical"
android:background="#00aaaa"
android:layout_width="wrap_content"
android:layout_height="wrap_content"
android:layout_weight="1">
<TextView
android:text="row_one"
android:textSize="15pt"
android:background="#aa0000"
android:layout_width="fill_parent"
android:layout_height="wrap_content"
android:layout_weight="1"/>
<TextView
android:text="row_two"
android:textSize="15pt"
android:layout_width="fill_parent"
android:layout_height="wrap_content"
android:layout_weight="1"/>
<TextView
android:text="row_three"
android:textSize="15pt"
android:layout_width="fill_parent"
android:layout_height="wrap_content"
android:layout_weight="1"/>
<TextView
android:text="row_four"
android:textSize="15pt"
android:layout_width="wrap_content"
android:layout_height="wrap_content"
android:layout_weight="1"/>
></LinearLayout>
</LinearLayout>
例程二:线性布局套表格布局
Layout04.java
ackage joes.layout04;
import android.app.Activity;
import android.os.Bundle;
publicclass Layout04 extends Activity {
/** Called when the activity is first created. */
@Override
publicvoid onCreate(Bundle savedInstanceState) {
super.onCreate(savedInstanceState);
setContentView(R.layout.second);
}
}
Second.xml
<?xml version="1.0" encoding="utf-8"?>
<LinearLayout xmlns:android="http://schemas.android.com/apk/res/android"
android:orientation="vertical"
android:layout_width="wrap_content"
android:layout_height="wrap_content"
>
<LinearLayout
android:orientation="horizontal"
android:layout_width="wrap_content"
android:layout_height="wrap_content"
android:layout_weight="1">
<TextView
android:text="red"
android:gravity="center_horizontal"
android:background="#aa0000"
android:layout_width="wrap_content"
android:layout_height="fill_parent"
android:layout_weight="1"/>
<TextView
android:text="green"
android:gravity="center_horizontal"
android:background="#00aa00"
android:layout_width="wrap_content"
android:layout_height="fill_parent"
android:layout_weight="1"/>
<TextView
android:text="blue"
android:gravity="center_horizontal"
android:background="#0000aa"
android:layout_width="wrap_content"
android:layout_height="fill_parent"
android:layout_weight="1"/>
<TextView
android:text="yellow"
android:gravity="center_horizontal"
android:background="#aaaa00"
android:layout_width="wrap_content"
android:layout_height="fill_parent"
android:layout_weight="1"/>
></LinearLayout>
<LinearLayout
android:orientation="vertical"
android:background="#00aaaa"
android:layout_width="wrap_content"
android:layout_height="wrap_content"
android:layout_weight="1">
<TableLayout
xmlns:android="http://schemas.android.com/apk/res/android"
android:layout_width="wrap_content"
android:layout_height="wrap_content"
android:stretchColumns="0">
<TableRow>
<TextView
android:text="@string/row1_column1"
android:padding="3dip"/>
<TextView
android:text="@string/row1_column2"
android:padding="3dip"
android:gravity="right"/>
</TableRow>
<TableRow>
<TextView
android:text="@string/row2_column1"
android:padding="3dip"/>
<TextView
android:text="@string/row2_column2"
android:padding="3dip"
android:gravity="right"/>
</TableRow>
</TableLayout>
</LinearLayout>
></LinearLayout>
String.xml
<?xml version="1.0" encoding="utf-8"?>
<resources>
<string name="hello">Hello World, Layout04!</string>
<string name="app_name">Layout04</string>
<string name="row1_column1">第一行第一列</string>
<string name="row2_column2">第二行第二列</string>
<string name="row1_column2">第一行第二列</string>
<string name="row2_column1">第二行第一列</string>
</resources>

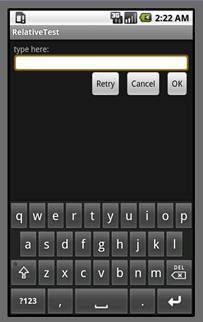
5. Android学习7—Activity布局初步(三)
相对布局:一个控件的位置决定于其和周围控件之间的关系,可使Activity当中的控件更加的灵活。
例程如下。
RelativeTest.java
package joes.relativetest;
import android.app.Activity;
import android.os.Bundle;
publicclass RelativeTest extends Activity {
/** Called when the activity is first created. */
@Override
publicvoid onCreate(Bundle savedInstanceState) {
super.onCreate(savedInstanceState);
setContentView(R.layout.main);
}
}
main.java
<?xml version="1.0" encoding="utf-8"?>
<!--
android:layout_above 将该控件的底部至于给定ID的控件之上
eg:android:layout_above="@id/XXX"
android:layout_below 将该控件的顶部至于给定ID的控件之下
android:layout_toLeftOf 将该控件的右边缘和给定ID的控件的左边缘对齐
android:layout_toRightOf 将该控件的左边缘和给定ID的控件的右边缘对齐
android:layout_alignBaseline 该控件的baseline和给定ID的控件的baseline对齐
android:layout_alignBottom 将该控件的底部边缘与给定ID控件的底部边缘
android:layout_alignLeft 将该控件的左边缘与给定ID控件的左边缘对齐
android:layout_alignRight 将该控件的右边缘与给定ID控件的右边缘对齐
android:layout_alignTop 将给定控件的顶部边缘与给定ID控件的顶部对齐
android:alignParentBottom 如果该值为true,则将该控件的底部和父控件的底部对齐
android:layout_alignParentLeft 如果该值为true,则将该控件的左边与父控件的左边对齐
android:layout_alignParentRight 如果该值为true,则将该控件的右边与父控件的右边对齐
android:layout_alignParentTop 如果该值为true,则将空间的顶部与父控件的顶部对齐
android:layout_centerHorizontal 如果值为真,该控件将被至于水平方向的中央
android:layout_centerInParent 如果值为真,该控件将被至于父控件水平方向和垂直方向的中央
android:layout_centerVertical 如果值为真,该控件将被至于垂直方向的中央
android:layout_marginLeft 外边距,与左边相邻控件之间的距离
-->
<RelativeLayout xmlns:android="http://schemas.android.com/apk/res/android"
android:layout_width="fill_parent"
android:layout_height="wrap_content"
android:padding="10px">
<TextView
android:id="@+id/label"
android:layout_width="fill_parent"
android:layout_height="wrap_content"
android:text="type here:"/>
<EditText
android:id="@+id/entry"
android:layout_width="fill_parent"
android:layout_height="wrap_content"
android:background="@android:drawable/editbox_background"
android:layout_below="@id/label"/>
<Button
android:id="@+id/ok"
android:layout_width="wrap_content"
android:layout_height="wrap_content"
android:layout_below="@id/entry"
android:layout_alignParentRight="true"
android:layout_marginLeft="10px"
android:text="OK"/>
<Button
android:id="@+id/cancel"
android:layout_width="wrap_content"
android:layout_height="wrap_content"
android:layout_toLeftOf="@id/ok"
android:layout_alignTop="@id/ok"
android:layout_marginLeft="10px"
android:text="Cancel"/>
<Button
android:layout_width="wrap_content"
android:layout_height="wrap_content"
android:layout_toLeftOf="@id/cancel"
android:layout_alignTop="@id/cancel"
android:text="Retry"/>
></RelativeLayout>
程序运行结果如下:
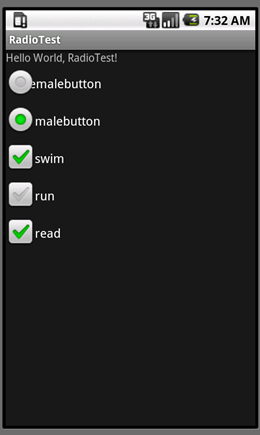
6. Android学习8—Android常见控件
(1)RadioGroup和RadioButton:代表Android当中的单选按钮控件。
(2)CheckBox:代表Android当中的多选按钮控件。
(3)Toast:控件的弹出信息。
例程如下:
RadioTest.java
package joes.radiotest;
import android.app.Activity;
import android.os.Bundle;
import android.widget.CheckBox;
import android.widget.CompoundButton;
import android.widget.RadioButton;
import android.widget.RadioGroup;
import android.widget.Toast;
publicclass RadioTest extends Activity {
//对控件对象进行定义
private RadioGroup genderGroup = null;
private RadioButton maleButton = null;
private RadioButton femaleButton = null;
private CheckBox swimBox = null;
private CheckBox runBox = null;
private CheckBox readBox = null;
@Override
publicvoid onCreate(Bundle savedInstanceState) {
super.onCreate(savedInstanceState);
setContentView(R.layout.main);
//通过控件的ID得到代表控件的对象
genderGroup = (RadioGroup)findViewById(R.id.genderGroup);
maleButton = (RadioButton)findViewById(R.id.maleButton);
femaleButton = (RadioButton)findViewById(R.id.femaleButton);
swimBox = (CheckBox)findViewById(R.id.swim);
runBox = (CheckBox)findViewById(R.id.run);
readBox = (CheckBox)findViewById(R.id.read);
//为RadioGroup设置监听器,注意这里的监听器和Button控件的监听器有所 不同
genderGroup.setOnCheckedChangeListener(new RadioGroup.OnCheckedChangeListener() {
@Override
publicvoid onCheckedChanged(RadioGroup group, int checkedId) {
// TODO Auto-generated method stub
if(femaleButton.getId() == checkedId){
System.out.println("female");
//(当前对象,显示的字符串,显示多长)前面显示Toast的一个对象,show为方法
Toast.makeText(RadioTest.this,"female",Toast.LENGTH_SHORT).show();
}
elseif(maleButton.getId() == checkedId){
System.out.println("male");
}
}
});
//为多选按钮添加监听器
swimBox.setOnCheckedChangeListener(new CompoundButton.OnCheckedChangeListener() {
@Override
publicvoid onCheckedChanged(CompoundButton buttonView, boolean isChecked) {
// TODO Auto-generated method stub
if(isChecked)
{
System.out.println("swim is checked");
}
else
{
System.out.println("swim is unchecked");
}
}
});
runBox.setOnCheckedChangeListener(new CompoundButton.OnCheckedChangeListener() {
@Override
publicvoid onCheckedChanged(CompoundButton buttonView, boolean isChecked) {
// TODO Auto-generated method stub
if(isChecked)
{
System.out.println("run is checked");
}
else
{
System.out.println("run is unchecked");
}
}
});
readBox.setOnCheckedChangeListener(new CompoundButton.OnCheckedChangeListener() {
@Override
publicvoid onCheckedChanged(CompoundButton buttonView, boolean isChecked) {
// TODO Auto-generated method stub
if(isChecked)
{
System.out.println("read is checked");
}
else
{
System.out.println("read is unchecked");
}
}
});
}
}
main.xml
<?xml version="1.0" encoding="utf-8"?>
<LinearLayout xmlns:android="http://schemas.android.com/apk/res/android"
android:orientation="vertical"
android:layout_width="fill_parent"
android:layout_height="fill_parent"
>
<TextView
android:id="@+id/textView1"
android:layout_width="fill_parent"
android:layout_height="wrap_content"
android:text="@string/hello"
/>
<RadioGroup
android:id="@+id/genderGroup"
android:layout_width="wrap_content"
android:layout_height="wrap_content"
android:orientation="vertical">
<RadioButton
android:id="@+id/maleButton"
android:layout_width="wrap_content"
android:layout_height="wrap_content"
android:text="@string/male"/>
<RadioButton
android:id="@+id/femaleButton"
android:layout_width="wrap_content"
android:layout_height="wrap_content"
android:text="@string/female"/>
></RadioGroup>
<CheckBox
android:id="@+id/swim"
android:layout_width="wrap_content"
android:layout_height="wrap_content"
android:text="@string/swim"/>
<CheckBox
android:id="@+id/run"
android:layout_width="wrap_content"
android:layout_height="wrap_content"
android:text="@string/run"/>
<CheckBox
android:id="@+id/read"
android:layout_width="wrap_content"
android:layout_height="wrap_content"
android:text="@string/read"/>
</LinearLayout>
Strings.xml
<?xml version="1.0" encoding="utf-8"?>
<resources>
<string name="hello">Hello World, RadioTest!</string>
<string name="app_name">RadioTest</string>
<string name="male">malebutton</string>
<string name="female">femalebutton</string>
<string name="run">run</string>
<string name="swim">swim</string>
<string name="read">read</string>
</resources>
该程序运行结果如下。
-
Android学习心得
Android学习心得这学期我们新开了一门课程android的研发在老师们的介绍下我们了解android的开发环境以及控件的功能刚…
-
Android的学习总结
Android的学习总结现在对于Android的学习已有斗个学期了,但它对我来说其实还是一个大大的谜,还有待我去对它一一揭晓。在还…
-
Android学习笔记总结初学者必看
Android学习笔记总结第一步Android1在Windows下搭建Android开发环境以及HelloWorld程序搭建And…
-
Android学习总结
1Text和text2Button和imagebutton区别1相同点都可以作为一个按钮产生点击事件产生明显的点击效果都有back…
-
Android学习总结
Android学习总结零零碎碎的总结1客户端的功能逻辑不难UI界面也不难但写UI花的时间是写功能逻辑的两倍2写代码前的思考过程非常…
-
android java 实习总结
1概述实习是一种实践,是理论联系实际,应用和巩固所学专业知识的一项重要环节,是培养我们能力和技能的一个重要手段。在本学期的期末假期…
-
Android学习之TextView属性总结
TextView作为android开发中最简单也最常用的控件,作为初学者,需要熟知其属性并熟练掌握。如下例:android:aut…
-
Android的学习总结
Android的学习总结现在对于Android的学习已有斗个学期了,但它对我来说其实还是一个大大的谜,还有待我去对它一一揭晓。在还…
-
Android 学习总结1
1应用程序配置全屏应用程序配置全屏:activityandroid:name=.BaseActivityandroid:theme…
-
十八个月Android学习工作总结(20xx-01-28更新)
零零碎碎的总结(该文章本人第一更新是在优亿论坛):1.客户端的功能逻辑不难,UI界面也不难,但写UI花的时间是写功能逻辑的两倍.2…