aspnet课程设计报告
重庆科技学院
《Asp.net动态网站设计》
课程设计报告
学 院:_电气与信息工程学院_ 专业班级:计科20##-02
学生姓名: 学 号:
设计地点(单位)__ _ 计算机基础自主学习中心 __ _
设计题目:_ 图书信息管理系统设计_______
完成日期:20##年 6 月 27 日
指导教师评语: ______________________ _________________
_______________________________________________________________________________________________________________________________________________________________________________________________________ __________ _
成绩(五级记分制):______ __________
指导教师(签字):________ ________
重庆科技学院
课程设计任务书
设计题目: 图书信息管理系统

教研室主任: 指导教师:刘海玲/游明英/张亚军 20##年06月23日
摘要
在科技发达的今天,图书馆还是在现在中占了很大部分,大多数学生都把图书馆当成了一个很好的学习的地方,里面的图书可以丰富我们的只是,所以对图书的管理也就很重要了。我们对图书的管理可以让同学们更好的了解到图书是否借出,对书籍好查看。
通过本系统达到以下目的:
1)使用ASP.NET操作数据库。
2)使用数据绑定控件显示和同步数据库数据。
3)在多个窗体之间交换数据。
4)熟悉运用SQL SERVER数据库软件。
关键词:图书管理 asp.net 数据库 控件
目 录
首页... I
摘要... III
1 软件需求分析说明书... 2
2 系统分析与设计... 3
2.1系统功能设计... 3
2.2 数据库设计... 3
2.2.1 图书管理系统中有2个表需要建立... 3
2.2.2实际操作... 4
3 系统实现... 5
3.1建库代码... 5
3.2 数据库连接... 5
3.3 Asp.net后台主要代码... 7
3.3.1注册模块... 7
3.3.2登陆界面... 9
3.3.3用户管理... 10
3.3.4登录... 12
3.3.5管理员界面... 14
3.3.6其他人员界面... 16
4 软件使用说明书... 18
致谢... 20
参考文献... 21
1 软件需求分析说明书
软件需求分析,其目的是用于说明软件产品或软件项目需要满足的条件和限制。在软件工程项目中,首先要获取用户的需求,通过对软件需要的提取、分析、文档化和验证,为进一步的设计和实现提供数据。软件需求与其他活动也密切相关,如软件测试、配置管理和质量管理等。
图书管理系统”主要提供图书信息和读者基本信息的维护以及借阅等功能。本系统是提高图书管理工作的效率,减少相关人员的工作量,使学校的图书管理工作真正做到科学、合理的规划,系统、高效的实施。
2 系统分析与设计
2.1系统功能设计
本系统实现了图书管理系统,总体分为以下几个模块:管理员界面(图书添加,修改,查询,删除),其他人员界面(查看)。

图1 系统功能模块图
2.2 数据库设计
在图书管理系统中,一本书只能被一个同学借出,一个用户可以多次登录,但只能注册一次,因此,图书管理系统设计的对象有同学,借书,书本信息.
2.2.1 图书管理系统中有2个表需要建立
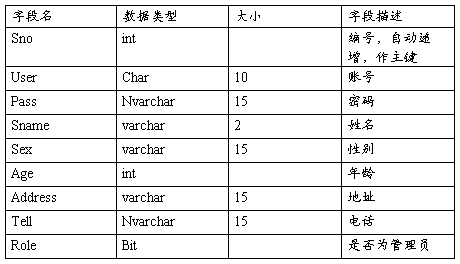
用户表(student),包括学生编号(sno)、学生账号(users)、密码(pass)、姓名(sname)、性别(sex)、年龄(age)、地址(address)、电话(tell)、管理员(Role);
图书表,包括图书编号(bid)、图书号(bno)、图书名(bname)、作者(writer)、价格(money)、借出(lend);
2.2.2实际操作
建立数据库book,建立如下各表
(1)用户表
包括编号、账号、密码、姓名、年龄、性别、地址、联系电话、家庭住址,用于存储用户的主要信息,可以通过前台对学生表数据进行增加、删除、修改、查询操作。用户的主键是users(用户账号)。用户表表是本数据库的重要信息表。
表1 用户表
(2)图书表
包括图书编号、图书号、图书名、作者、价格等。用于图书的主要信息,可以通过前台对图书表数据进行增加、删除、修改、查询操作。图书表的主键是bno(图书号),图书表是本数据库的重要信息表。
表2 图书表

3 系统实现
3.1建库代码
--创建数据库book
create database book;
--连接数据库book
use book;
--创建student表
CREATE TABLE student(
sno int,
users char(5) primary key,
pass varchar(8) not null,
sex char(2) check(sex in('男','女')),
sname varchar(20) not null,
age int,
address varchar(50) not null,
tell varchar(15),
role bit
)
--创建bok表
CREATE TABLE bok(
bid int not null,
bno char(5) primary key,
bname varchar(10),
writer varchar(15),
monry char(5) not null,
)
3.2 数据库连接
该系统所有的数据库的连接参数都在配置文件web.config文件中
<connectionStrings>
<add name="dbconnectionstring" connectionString="Data Source=I301-37\SQLEXPRESS;Initial Catalog=book;Integrated Security=True" providerName="System.Data.SqlClient" />
</connectionStrings>
<system.web>
<compilation debug="true" targetFramework="4.0" />
<authentication mode="Forms">
<forms loginUrl="~/Account/Login.aspx" timeout="2880" />
</authentication>
<membership>
<providers>
<clear/>
<add name="AspNetSqlMembershipProvider" type="System.Web.Security.SqlMembershipProvider" connectionStringName="ApplicationServices"
enablePasswordRetrieval="false" enablePasswordReset="true" requiresQuestionAndAnswer="false" requiresUniqueEmail="false"
maxInvalidPasswordAttempts="5" minRequiredPasswordLength="6" minRequiredNonalphanumericCharacters="0" passwordAttemptWindow="10"
applicationName="/" />
</providers>
</membership>
<profile>
<providers>
<clear/>
<add name="AspNetSqlProfileProvider" type="System.Web.Profile.SqlProfileProvider" connectionStringName="ApplicationServices" applicationName="/"/>
</providers>
</profile>
<roleManager enabled="false">
<providers>
<clear/>
<add name="AspNetSqlRoleProvider" type="System.Web.Security.SqlRoleProvider" connectionStringName="ApplicationServices" applicationName="/" />
<add name="AspNetWindowsTokenRoleProvider" type="System.Web.Security.WindowsTokenRoleProvider" applicationName="/" />
</providers>
</roleManager>
</system.web>
<system.webServer>
<modules runAllManagedModulesForAllRequests="true"/>
</system.webServer>
</configuration>
3.3 Asp.net后台主要代码
3.3.1注册模块
只有注册成为用户之后才能使用本系统,注册需要输入用户名,密码,再次输入密码等等,然后点击注册按钮,其具体效果图如图2所示:
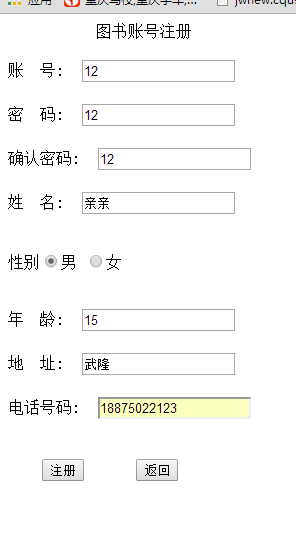
图2 用户注册界面
namespace 课?程¨¬设¦¨¨计?.lib
{
public partial class 注Á¡é册¨¢ : System.Web.UI.Page
{
protected void Page_Load(object sender, EventArgs e)
{
}
protected void Button1_Click(object sender, EventArgs e)
{
string users = this.TextBox1.Text.Trim();
string pass = this.TextBox2.Text.Trim();
string pass1 = this.TextBox3.Text.Trim();
string sname = this.TextBox4.Text.Trim();
string sex = "";
string age = this.TextBox5.Text.Trim();
string address = this.TextBox6.Text.Trim();
string tell = this.TextBox7.Text.Trim();
if (RadioButton1.Checked ==true)
{
sex = RadioButton1.Text;
}
else
{
sex = RadioButton2.Text;
}
string sqlStr = "select users from student where users='" + users + "'";
DB db=new DB();
bool count = db.GetReader(sqlStr).HasRows;
if (count)
Response.Write("<script>alert('账?号?存ä?在¨²!');location='注Á¡é册¨¢.aspx'</script>");
else
if (this.TextBox1.Text!="")
{
string sqlStr1 = "insert into student(users,pass,sname,sex,age,address,tell)values('" + users + "','" + pass + "','" + sname + "','" + sex + "','" + age + "','" + address + "','" + tell + "')";
int count1 = db.ExectSql(sqlStr1);
if (count1 > 0)
{
Response.Write("<script>alert('注Á¡é册¨¢成¨¦功|!ê?');</script>");
Clear();
}
else
{
Response.Write("<script>alert('注Á¡é册¨¢失º¡ì败㨹!ê?';location='注Á¡é册¨¢.aspx')</script>");
}
}
}
public void Clear()
{
this.TextBox1.Text = "";
this.TextBox2.Text = "";
this.TextBox3.Text = "";
this.TextBox4.Text = "";
this.TextBox5.Text = "";
this.TextBox6.Text = "";
this.TextBox7.Text = "";
}
protected void Button2_Click(object sender, EventArgs e)
{
Response.Redirect("登Ì?录?.aspx");
}
}
}
3.3.2登陆界面
用户注册后便可登录,输入用户名和密码,点击登录按钮便可成功登陆,具体效果如图3所示
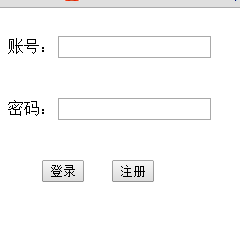
图3 登陆界面
namespace 课?程¨¬设¦¨¨计?.lib
{
public partial class 登Ì?录? : System.Web.UI.Page
{
protected void Page_Load(object sender, EventArgs e)
{
}
protected void Button1_Click(object sender, EventArgs e)
{
string users = this.TextBox1.Text.Trim();
string pass = this.TextBox2.Text.Trim();
string sqlStr = "select users from student where users='" + users + "'and pass='" + pass + "'";
DB db = new DB();
SqlDataReader dr = db.GetReader(sqlStr);
/// dr.Read();
if (dr.HasRows)
{
// Session["sno"] = dr.GetValue(0);
// Session["Role"] = dr.GetValue(8);
Response.Redirect("管¨¹理¤¨ª员¡À界?面?.aspx");
}
else
{
Response.Write("<script>alert('登Ì?录?失º¡ì败㨹!ê?');location='登Ì?录?.aspx'</script>");
}
dr.Close();
}
protected void Button2_Click(object sender, EventArgs e)
{
Response.Redirect("注Á¡é册¨¢.aspx");
}
}
}
3.3.3用户管理
用户登陆成功后便可进入用户管理页面,选择是否为管理员。具体效果如图4所示

图4 用户管理界面
namespace 课?程¨¬设¦¨¨计?.lib
{
public partial class 管¨¹理¤¨ª员¡À界?面? : System.Web.UI.Page
{
protected void Page_Load(object sender, EventArgs e)
{
if (!IsPostBack)
{
dbind();
}
}
public void dbind()
{
SqlConnection myCon =DB.GetConnection();
myCon.Open();
string sqlStr = "select * from student";
SqlDataAdapter myDa = new SqlDataAdapter(sqlStr, myCon);
DataSet myDs = new DataSet();
myDa.Fill(myDs);
GridView1.DataSource = myDs;
GridView1.DataBind();
myCon.Close();
}
protected void GridView1_RowEditing1(object sender, GridViewEditEventArgs e)
{
GridView1.EditIndex = e.NewEditIndex;
this.dbind();
}
protected void GridView1_OnRowUpdating1(object sender, GridViewUpdateEventArgs e)
{
int id = Convert.ToInt32(GridView1.DataKeys[e.RowIndex].Value.ToString());
string sname = ((TextBox)(GridView1.Rows[e.RowIndex].Cells[0].Controls[0])).Text.ToString();
string tell=((TextBox)(this.GridView1.Rows[e.RowIndex].Cells[1].Controls[0])).Text.ToString();
string Role = ((CheckBox)(this.GridView1.Rows[e.RowIndex].Cells[2].Controls[0])).Checked.ToString();
string sqlStr = "update student set sname='" + sname + "',tell='" + tell + "',Role='" + Role + "'where users=" + id;
DB db = new DB();
db.ExectSql(sqlStr);
GridView1.EditIndex = -1;
dbind();
}
protected void GridView1_OnRowCancelingEdit1(object sender, GridViewCancelEditEventArgs e)
{
GridView1.EditIndex = -1;
this.dbind();
}
protected void GridView1_OnRowDeleting(object sender, GridViewDeleteEventArgs e)
{
DB db = new DB();
int id = Convert.ToInt32(GridView1.DataKeys[e.RowIndex].Value.ToString());
string sqlStr = "delete from student where users=" + id;
db.ExectSql(sqlStr);
GridView1.EditIndex = -1;
dbind();
}
protected void LinkButton1_Click(object sender, EventArgs e)
{
Response.Redirect("second.aspx");
}
//protected void GridView1_OnRowDataBound(object sender, GridViewRowEventArgs e)
//{
// if (e.Row.RowType == DataControlCellType.DataRow)
// {
// ((LinkButton)e.Row.Cells[4].Controls[0]).Attributes.Add("onclick","return confirm('确¨¡¤定¡§删¦?除y?ê?')");
// dbind();
// }
//}
}
}
3.3.4登录
点击退出过后再次进入登录页面,根据你是否为管理员进入不同的页面

图5 登录页面
namespace 课?程¨¬设¦¨¨计?.lib
{
public partial class second : System.Web.UI.Page
{
protected void Page_Load(object sender, EventArgs e)
{
}
protected void Button1_Click(object sender, EventArgs e)
{
string users = this.TextBox1.Text.Trim();
string pass = this.TextBox2.Text.Trim();
string sqlStr = "select users from student where users='" + users + "'and pass='" + pass + "'";
DB db = new DB();
SqlDataReader dr = db.GetReader(sqlStr);
dr.Read();
if (dr.HasRows)
{
// Session["sno"] = dr.GetValue(0);
Session["Role"] = dr.GetValue(0);
if(dr.GetValue(0)==null)
{
Response.Redirect("about.aspx");
}
else
{
Response.Redirect("main.aspx");
}
}
else
{
Response.Write("<script>alert('登Ì?录?失º¡ì败㨹!ê?');location='登Ì?录?.aspx'</script>");
}
dr.Close();
}
protected void Button2_Click(object sender, EventArgs e)
{
Response.Redirect("注Á¡é册¨¢.aspx");
}
}
}
3.3.5管理员界面
用户通过输入账号密码,为管理员进入此页面,具体效果如图6所示

图6 管理员界面
namespace 课?程¨¬设¦¨¨计?.lib
{
public partial class 管¨¹理¤¨ª员¡À界?面? : System.Web.UI.Page
{
protected void Page_Load(object sender, EventArgs e)
{
if (!IsPostBack)
{
dbind();
}
}
public void dbind()
{
SqlConnection myCon =DB.GetConnection();
myCon.Open();
string sqlStr = "select * from student";
SqlDataAdapter myDa = new SqlDataAdapter(sqlStr, myCon);
DataSet myDs = new DataSet();
myDa.Fill(myDs);
GridView1.DataSource = myDs;
GridView1.DataBind();
myCon.Close();
}
protected void GridView1_RowEditing1(object sender, GridViewEditEventArgs e)
{
GridView1.EditIndex = e.NewEditIndex;
this.dbind();
}
protected void GridView1_OnRowUpdating1(object sender, GridViewUpdateEventArgs e)
{
int id = Convert.ToInt32(GridView1.DataKeys[e.RowIndex].Value.ToString());
string sname = ((TextBox)(GridView1.Rows[e.RowIndex].Cells[0].Controls[0])).Text.ToString();
string tell=((TextBox)(this.GridView1.Rows[e.RowIndex].Cells[1].Controls[0])).Text.ToString();
string Role = ((CheckBox)(this.GridView1.Rows[e.RowIndex].Cells[2].Controls[0])).Checked.ToString();
string sqlStr = "update student set sname='" + sname + "',tell='" + tell + "',Role='" + Role + "'where users=" + id;
DB db = new DB();
db.ExectSql(sqlStr);
GridView1.EditIndex = -1;
dbind();
}
protected void GridView1_OnRowCancelingEdit1(object sender, GridViewCancelEditEventArgs e)
{
GridView1.EditIndex = -1;
this.dbind();
}
protected void GridView1_OnRowDeleting(object sender, GridViewDeleteEventArgs e)
{
DB db = new DB();
int id = Convert.ToInt32(GridView1.DataKeys[e.RowIndex].Value.ToString());
string sqlStr = "delete from student where users=" + id;
db.ExectSql(sqlStr);
GridView1.EditIndex = -1;
dbind();
}
protected void LinkButton1_Click(object sender, EventArgs e)
{
Response.Redirect("second.aspx");
}
}
}
3.3.6其他人员界面
用户可查看图书是否借出。具体效果如图7所示

图7 房间删除界面
namespace 课?程¨¬设¦¨¨计?.lib
{
public partial class about : System.Web.UI.Page
{
protected void Page_Load(object sender, EventArgs e)
{
dbind();
}
public SqlConnection getConnection()
{
string connstr = System.Configuration.ConfigurationManager.ConnectionStrings["dbconnectionstring"].ToString();
SqlConnection myCon = new SqlConnection(connstr);
return myCon;
}
public void dbind()
{
SqlConnection myCon = getConnection();
myCon.Open();
string sqlStr = "select * from bok";
SqlDataAdapter myDa = new SqlDataAdapter(sqlStr, myCon);
DataSet myDs = new DataSet();
myDa.Fill(myDs);
GridView1.DataSource = myDs;
GridView1.DataBind();
myCon.Close();
}
}
}
4 软件使用说明书
图书管理系统主要负责图书的添加,借出和修改,让同学们更好、更快的利用查询功能进入,查看需要的图书。
(1) 添加图书,图书就会自动添加到指定表中,并更新出来。
(2) 删除图书,图书就会自动从表中删除。
(3) 修改图书,图书就会自动从表中删除。
总结
本设计使用SQL Server2008 创建后台数据库,使用Visual Studio 2010为前台操作界面实现对图书信息管理系统的功能操作。该网站实现了对查看的基本功能,以及管理员可以对图书的添加、修改功能等。但也存在某些不足,比如说数据库还有待扩充及完善,某些管理功能上需要继续细化,一些模块的界面设计和使用方便性方面任然需要改进,让系统更加美观、实用、高效。
致谢
在本次制作课程设计的过程中,得到了很多人帮助。首先要感谢我们刘老师,游老师和张老师,正是因为平时的严格要求才使得我们有良好的基础完成这次试验,为我们提供良好的实验环境,在我们遇到问题时对我们进行指导许多疑难问题得到了解决。在这里对您表示诚挚的感谢。
这次课程设计,还要感谢同学们的帮助,对与细节上自己没有注意的问题给予了帮助,是本次课程设计有了更深一步的了解和认识,加深了印象。与此同时,更加深刻地体会到团队精神的重要性,一个人的力量是永远不够的,只有同心协力,才能把系统做的更加完善。在程序运行及操作时,由于老师和同学的热心帮助是本次课程设计才能及时的完成。其实,完成课程设计的同时也明白了一个道理:集体的力量真的是很大,以前对集体没有什么深刻的认识,不过通过这次程设计,明白了这个至古不变的道理。
还要感谢的图书馆中提供的书籍和参考资料,使有些问题和疑难能过顺利的解决。
最后再一次感谢在完成课程设计中给予我帮助的老师和同学们!
参考文献
[1]ASP.NET网站设计教程 刘萍,赵颖 清华大学出版社 2012.12
[2]ASP.NET程序设计教程 金旭亮 高等教育出版社 2010
[3]王珊,萨师煊.数据库系统概论(第四版).高等教育出版社.20##-11-1
-
aspnet课程设计报告
重庆科技学院Aspnet动态网站程序设计课程设计报告重庆科技学院课程设计任务书设计题目图书信息管理系统重庆科技学院Aspnet动态…
-
学生管理系统asp课程设计报告1
课程设计任务书题目学生信息管理系统设计与实现学号姓名专业信息管理课程Aspnet程序设计案例教程指导教师讲师完成时间2011年11…
-
.net课程设计报告
湖南涉外经济学院课程设计报告课程名称:ASP.NET报告题目:网吧管理系统学生姓名:**所在学院:信息科学与工程学院专业班级:计应…
-
c#.net课程设计报告
CNet编程课程设计报告项目名称学生信息管理系统班级09级1班成员CNet编程课程设计目录一概述311项目背景312项目目标3二系…
-
C#.Net课程设计报告
重庆科技学院课程设计报告院系电子信息工程学院班级学生姓名XXX学号XXXXXXXXXXXXXX设计地点单位设计题目新闻发布管理系统…
-
.net课程设计实验报告
实验目的通过软件开发的实践训练进一步了解软件工程的方法和技术提高软件开发的实际能力培养工程设计能力和综合分析解决问题的能力具体如下…
-
《.net平台应用与开发》课程设计报告
重庆科技学院net平台应用与开发课程设计报告学院电气与信息工程学院专业班级计科01班学生姓名学号20xx4设计地点单位I302设计…
-
燕山大学.net程序设计实验报告
燕山大学Net程序设计实验报告学院信息科学与工程学院年级专业11级指导教师任大伟学生学号110104010131学生姓名刘丽丽提交…
-
学生管理系统asp课程设计报告1
课程设计任务书题目学生信息管理系统设计与实现学号姓名专业信息管理课程Aspnet程序设计案例教程指导教师讲师完成时间2011年11…
-
.net课程设计报告
湖南涉外经济学院课程设计报告课程名称:ASP.NET报告题目:网吧管理系统学生姓名:**所在学院:信息科学与工程学院专业班级:计应…
-
.net实验报告2
河南城建学院网站建设技术实验报告实验名称用户名密码登录切图制作网站专业班级软件工程姓名吴春龙学号084413147实验日期20xx…